We managed a couple of trips on the new Elizabeth Line; it was partially open on our last trip to London in 2022 but we didn’t need to use it then. The stations are impressive and I appreciated the greater accessibility, but I couldn’t help but feel that the trains themselves already look a little tired. It may be the use of grey interior panels; they felt a little dark and not as bright internally as other new trains elsewhere. It’s good to see it being well-used despite being opened for less than two years.
We normally manage one trip to London each year – we missed 2020 for obvious reasons, but also didn’t manage to go last year either. We may have a shorter visit later this year, but with journeys taking 3 hours each way and the costs, it’s not something that we can do on a whim.
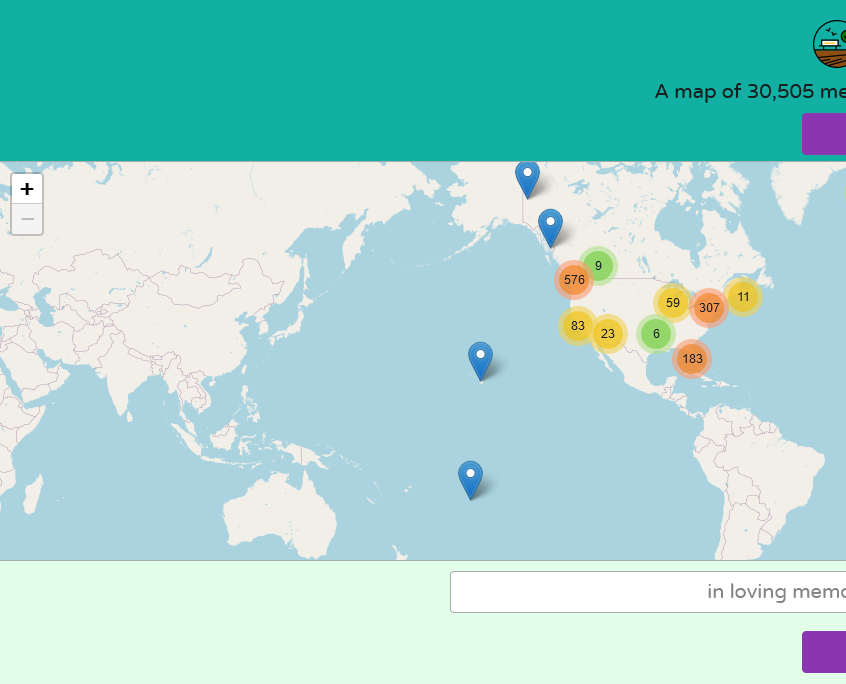
Have you ever wondered if there was a list of benches with public dedications on them? Well, I haven’t, but there is one and it’s called OpenBenches.
It’s similar to Open Plaques, which is crowd-sourced list of plaques on the sides of buildings commemorating notable people or events that happened. OpenBenches, meanwhile, is for people who may not have been notable, but were loved and missed by their friends and relatives after their passing.
Anyone can submit a bench, as long as you can upload a photo of it that is geotagged. With most photos being taken with phones these days, this isn’t much of an issue. Of course, the bench should have a dedication on it, and you’ll need to type out what the dedication says. Submissions can be made anonymously, or by logging in using an account on Twitter/X, Facebook, GitHub or WordPress.
There’s now over 30,000 benches on OpenBenches, all with a location, a photo and a copy of the text of the dedication. However, over 28,000 of them are in the UK, with few elsewhere. That may be because dedicating a bench to someone is more of a British thing, or because its developers (Terence Eden and Elizabeth Eden) are British.
There aren’t any benches listed on there in my town of Sowerby Bridge yet. I think there are some eligible benches nearby, so maybe I should take the time to go and take photos of them to add them.
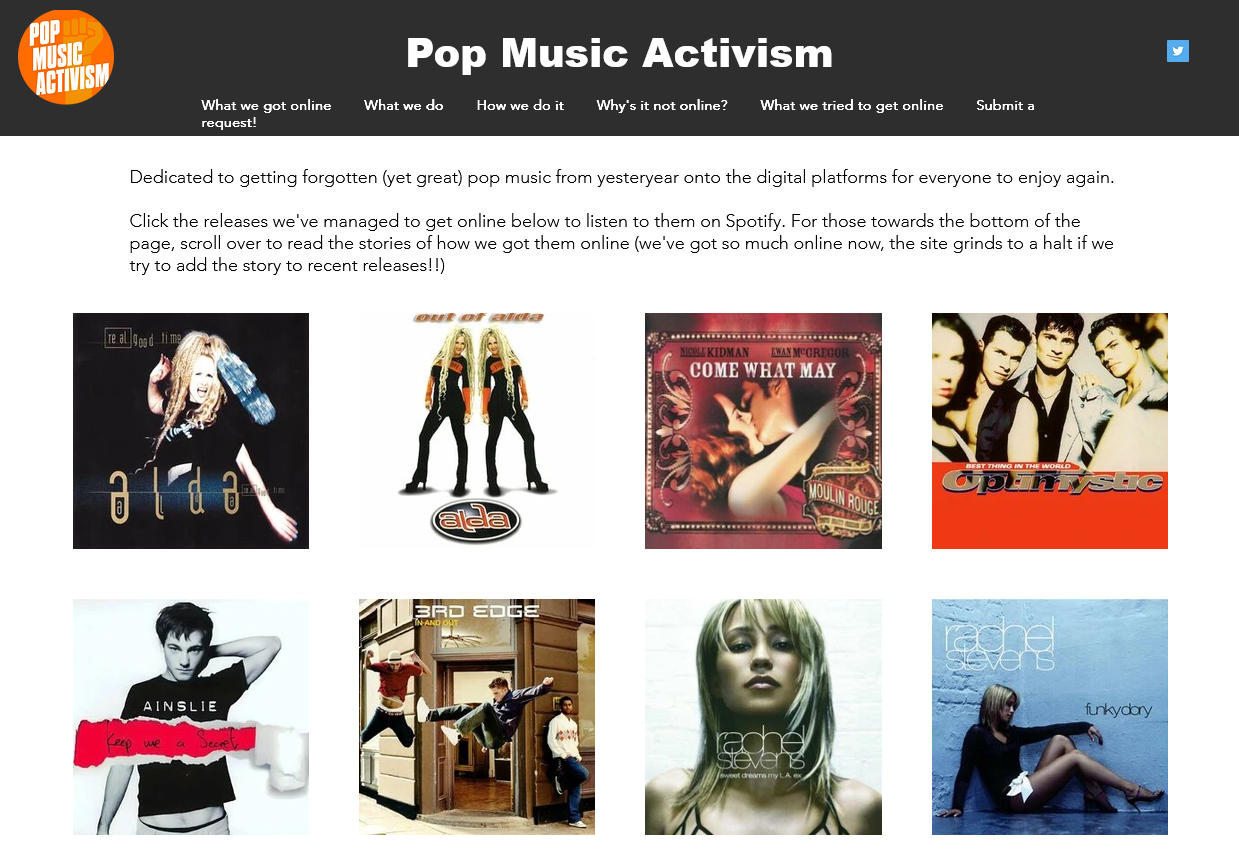
Have you ever been frustrated that some older music isn’t available on digital platforms like Spotify or iTunes? You’re not alone, and Pop Music Activism is trying to do something about it.
There are several reasons why music is missing from these platforms, and indeed there’s a list of the common ones. A lot of dance music from the 1990s and 2000s is missing, and this is often because songs were released by different labels in different countries. It wasn’t until the late 2000s that Spotify came along.
For some artists and bands, you may find their albums there, but not their singles. So remixes and b-sides are harder to come by. Or you may find that the song you want appears in a web search, but when you follow the link, it’s been geo-blocked.
This is where Pop Music Activism comes in. They track down who has the rights, and politely badger them to get the music online. And it works – the home page of the web site has hundreds of releases that are now available to legally stream and download. There have been some particular successes, such Things That Go Bump In The Night by *allStars, which after becoming available again appeared in lots of Hallowe’en playlists and has clocked up over 4 million streams on Spotify. Whilst Spotify pays a fraction of a penny per stream, it’s more than the nothing that these songs were earning before, due them not legally being available anywhere.
If you want to keep track of what ‘new’ old songs become available, you can follow them on Twitter/X. Usually, there’s something new each week on a Friday. It’s about the only reason I still occasionally log into Twitter nowadays. There’s also a monthly email list which I’m on, but can’t seem to find the subscribe link.
I like CarPlay, and have a standalone unit in my car. Most CarPlay apps are designed for either navigation or for listening to audio content whilst driving, but Apple has allowed some other apps more recently. For example, the RingGo parking app is now available in CarPlay; I wish the same could be said for the four other parking apps I have installed.
The Home Assistant app has four tabs: Actions, Areas, Control and Servers. Areas gives you the list of rooms that you have defined, and from there you can access some of your devices. Control gives you a big list of all of the devices that have a function that can be controlled whilst using CarPlay – mainly buttons and switches. Meanwhile the Servers tab is there in case you’re able to log in to more than one Home Assistant instance.
Actions are unique to the Home Assistant Companion app. They link to automations, but have a specific trigger. At the moment, I’m only really using actions to control my Nest thermostat as this is usually the only thing I want to control outside the home. Actions are also used by widgets on iOS, and by the Apple Watch integration. They’re a bit of a faff to set up at present; this video seems to be the best guide to setting them up.
It should be noted that Home Assistant also supports Android Auto, and indeed has done for longer. CarPlay support was new in January but it’s taken me until now to get it set up and remember to take some screenshots.
I’m really happy about this new feature, as being able to safely control my heating whilst driving isn’t something I’ve been able to do before. It makes the time that I’ve spent setting up and tweaking my Home Assistant server worthwhile.
Well, actually, I’m writing this on Saturday 24th. I tend to write blog posts in bulk at the weekends, and then schedule them to go live every other day over the week. In any case, I’m unlikely to have time to write much today, as this morning I’m at work and then we’re off to London tonight for a long weekend.
But as the opportunity to publish a blog post on the 29th only comes around once every four years, here you go. And I missed 2020 as I wasn’t blogging then. Had I been, I’d have probably said something about the-then looming pandemic. Ironically, I wrote this on the 29th February 2016:
Maybe something interesting will happen on this day in 2020, but you’ll have to wait another four years to find out, I’m afraid.
Time for the fourth instalment of my Playlist of the Month, and this month, it’s all about alcohol and drinking seeing as Dry January is over. Unlike last month, this was a relatively easy topic to come up with.
Here’s the Spotify playlist if you want to listen along.
Drink – Alestorm. As you’d expect from a band called Alestorm, they’ve written a lot of songs about drinking over their seven (soon to be eight) albums. This was the first single from the fourth (and in my view best) album. Indeed it’s about 11 years ago since I saw them in Leeds.
Cigarettes and Alcohol – Oasis. I’m not a big Oasis fan but any playlist about alcohol would be remiss without this.
Vodka – Korpiklaani. This Finnish folk metal band has several songs about alcohol, with others including ‘Happy Little Boozer’ and ‘Bring Us Pints Of Beer’. ‘Vodka’ is probably their best.
Whiskey in the Jar – Metallica. It’s a traditional Irish folk song but this version by Metallica is probably its best known recording. A staple at any ceilidh.
Love Drunk – Boys Like Girls. You can be drunk, and indeed hungover, on love as well as alcohol, and this is one of my favourite songs in this genre.
Drinking in LA – Bran Van 3000. Quite the one-hit wonder from 1997.
Tequila – Terrorvision. A local band coming from just up the road from me in Keighley; this was probably their biggest hit thanks to a remix by Mint Royale.
Tubthumping – Chumbawumba. Another big song from the 1990s. Whilst Chumbawumba have released 16 albums to date, this is by far their most well-known song.
Drunken Lullabies – Flogging Molly. Another Irish-themed song; again, Flogging Molly have no shortage of songs about drinking but this is their most well-known song.
Beer – Reel Big Fish. And finally, a bit of ska to finish off.
Last week, we cancelled Disney+. Our annual subscription was due to renew, and at over £100 for the year, we could no longer justify it.
We’ve had a subscription ever since Disney+ launched in the UK, in the early days of lockdown in 2020. In fact, before then we had a subscription to DisneyLife, which was Disney’s UK-only streaming service for video and music, and used to cost £5 per month. Over time, Disney+ has got better, especially now that content from 20th Century Fox is on there.
But we just don’t watch enough of it. When we signed up to Disney+, there was only one price tier at £7.99 per month or £79 per year. Whilst that was more expensive than DisneyLife, there was more content available so it was worth it. Now there are three price tiers, and the most expensive is £10.99 per month, or £109 per year. That’s more than double what we were paying just five years ago. Whilst there is once again a £5 per month tier, it’s with adverts, and we don’t want those.
Like many kids, our eight-year-old seems to just want to watch YouTube Kids now. It’s something we’ve tried to resist for years, but apparently watching home-made videos and Minecraft walk-throughs is far more interesting than the professionally-produced content that we were paying for. We’ll keep paying for Netflix, as you can download content onto an iPad to watch offline. We tend to clip our eight-year-old’s iPad into a stand fixed to the back of the front passenger seat for long car journeys.
We’ve had Amazon Prime in the past, shared using Amazon Household with another family member, but we don’t have this now. Again, it’s getting more expensive, and we’d rather avoid the adverts. And whilst we’ve had free trials of Apple TV+ and Now TV, we’ve never paid for these beyond the trial period. We also don’t pay for a TV package, and just have Freeview and Freesat for live television.
I guess we’ll just re-subscribe to these from time-to-time when there’s something we actually want to watch.
I do find it odd comparing streaming video with streaming music. There’s a handful of music streaming services – Spotify, YouTube Music, Amazon Music, Deezer and so forth – and for the most part, they all have the same music. Yet with streaming video services, most shows are on one or two at best, and many or exclusive to one service.
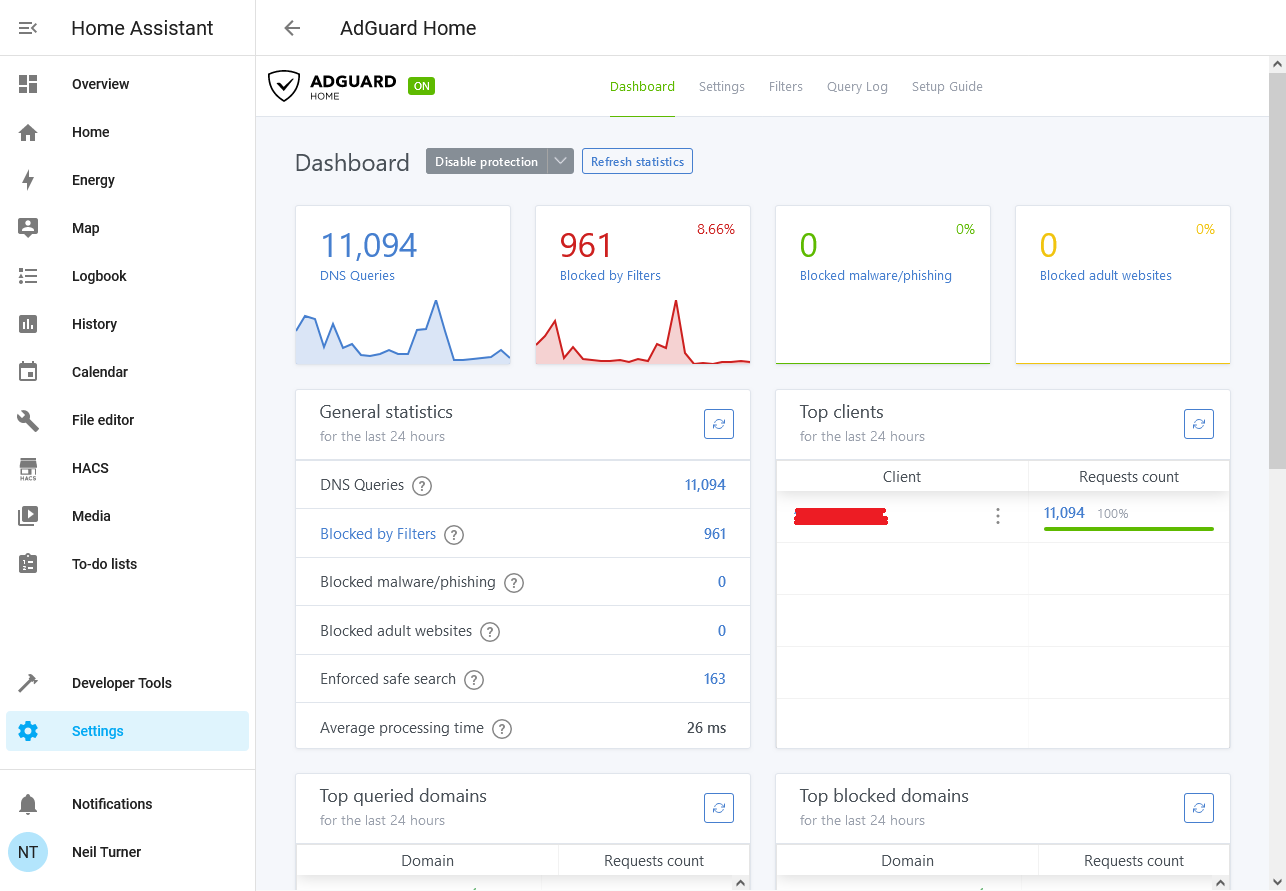
I’ve recently started using AdGuard Home as a way of blocking advertising and tracking on my iPhone and iPad, when on wifi at home. It works as a replacement DNS server, and re-routes requests to domains known for advertising and traffic to a DNS Sinkhole.
Unlike a browser-based ad blocking extension, such as uBlock Origin or Firefox Focus, by intercepting DNS requests AdGuard Home can stop tracking in all apps. That includes built-in browsers in apps, such as the Facebook app, as well as any app analytics tools. As I have an almost 6 year old 6th generation iPad that is getting rather slow, not having to load additional advertising and tracking scripts has boosted its performance and battery life.
Installing AdGuard
To run AdGuard Home, you’ll need a spare computer that can run all the time. A Raspberry Pi is ideal for this, as it’s small, low energy and can be run without a keyboard and mouse. You can also use Docker, Snap, or do as I do and run it as a Home Assistant addon. Indeed, once it’s set up, Home Assistant will detect it and offer to install an integration.
You can then adjust your router’s DNS settings, so that every device in your home uses your new AdGuard DNS server. This will block adverts and tracking across all of your devices if you want it to. I’ve chosen not to do this; whilst many tracking sites are a privacy nightmare, I also use sites like Quidco to get cashback. I use Google Chrome with no privacy features turned on when making purchases that could be eligible for cashback; this earned me over £80 when we switched our broadband supplier to Vodafone recently.
For me, just having it running on my mobile devices when at home on wifi is enough.
Whilst AdGuard offers other tools that are paid-for, AdGuard Home is free and open source.
Pi-hole
Pi-hole is similar to AdGuard, in that it is also a DNS-based ad blocker. As the name suggests, it was intended for use on Raspberry Pi computers, but can be installed on other devices. I had investigated installing this, but came across AdGuard as an easier alternative. Pi-hole is also open source, but development seems less active.
Advanced features
For the most part, once you’ve installed AdGuard Home and set it as your DNS server, you don’t need to do much else. However, you can enable DNS Encryption if you want – especially if you want to access your AdGuard server from outside the home. You can also use AdGuard Home to block adult content, or access to certain web sites, and configure this for individual devices. So, I could enable parental controls on our eight-year-old’s tablet using AdGuard without restricting my devices.
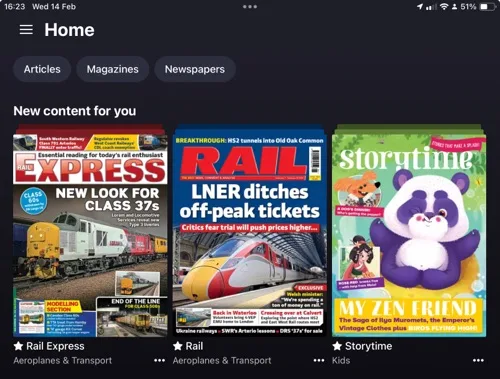
When it comes to reading magazines on a computer or tablet, you may well have heard of Readly, seeing as it’s widely advertised. But there’s a competitor, PressReader, that’s also worth considering. I’ve used both, and so here’s a comparison of the two.
Fundamentally, both services let you read as many digital magazines (and some newspapers) as you like, for a flat monthly fee. Both claim to offer thousands of titles.
Readly
As mentioned, Readly is probably the best known, as it’s advertised in lots of podcasts and through other third parties. Indeed, if you fancy trying it, you may find that a two or even three month free trial is available with a bit of searching (as opposed to the standard one month free trial). Normally, it costs £9.99 per month and claims to offer over 7000 titles to read.
You can be notified of new issues, and have these automatically download when you’re on wifi for offline reading. Pages in magazines can be bookmarked, and there’s a ‘mobile view’ which reformats pages for easier reading on smaller screens. I use this a lot; though I read magazines on an iPad, it simplifies the formatting and reduces the amount of pinch zooming needed.
PressReader
I hadn’t heard of PressReader until a couple of months ago. It claims to offer over 8000 titles to read; many of these seem to be the same as Readly but it also includes some additional magazines like The Economist. There’s also some non-UK newspapers like the Wall Street Journal and New York Times.
Like with Readly, magazines can be downloaded for offline reading, and it’ll reformat pages too. Indeed, on the whole it does this better than Readly, although sometimes it cut articles short. It also handles light and dark mode better on iOS.
Pricing is where things get a little more complicated. There is a free tier available, with around 500 magazines available to read. The ‘premium’ subscription, with unlimited access to all of its titles, is much more expensive than Readly – £27.49 per month, with only a 7 day free trial. So, in a nutshell, PressReader is almost three times more expensive than Readly.
But it’s not quite that simple. Many local libraries offer free access to PressReader through its HotSpot system. Indeed, this is how I found out about it. In West Yorkshire, Bradford, Calderdale, Kirklees and Wakefield libraries all offer complementary access, as long as you have a library card with one of them. Sorry Leeds residents, but your council doesn’t offer this, although it is available for Leeds Beckett University students and The Leeds Library members. Some hotel chains like Marriott offer this too.
The catch is that you may need to re-authenticate with your library on a regular basis. Where I am in Calderdale, this is every 30 days but could be as little as 24 hours in some places.
So do I use Readly or PressReader?
If it wasn’t already obvious, I used Readly for quite some time. However, when I found out that PressReader was available for free, I switched last month and cancelled my Readly subscription.
I had been contemplating cancelling Readly in any case. When I first subscribed, I was regularly reading both Rail and Modern Railways, and previously had subscriptions for each. Readly was slightly more expensive per month, but offered a better reading experience. However, Modern Railways hasn’t been available from Readly since the beginning of last year, or indeed any other unlimited magazine platform.
Something to consider is that, when you cancel Readly, you’ll get a special offer to try to keep you as a customer. In my case, this was a 40% discount for three months, if I remember correctly. So if you do subscribe to Readly, maybe try cancelling it once a year to see if they offer you a discount.
Pocketmags Plus+
I thought it would also be worth mentioning Pocketmags Plus+ here as a third alternative. Pocketmags Plus+ doesn’t offer nearly as many magazines – around 600, rather than thousands – but it does have a few that aren’t available on the other platforms. There’s no free trial but the first month is 99p, and then £9.99 thereafter.
On Friday, I found a bat on the floor of our cellar. There’s a photo of it above.
This was a problem. Bats are well-known for being mammals that can fly, and when they’re not flying, they hang upside down to rest. A ‘grounded’ bat lying on the floor is not a sign of a healthy bat.
A quick search led me to the ‘Help! I’ve found a bat‘ page on the Bat Conservation Trust web site. I gave the National Bat Helpline a call, and contained the bat in a shoebox with a small dish of water until a volunteer could arrive to rescue it.
Although it took a while, a lovely volunteer came on Friday evening to collect the bat and take it to a place of safety, where it could be fed and then (hopefully) be released back into the wild. By this time, my wife and eight-year-old got to see the bat, which was nice as my wife loves bats. And it’ll be an interesting story to tell at school this week.
We also found out that it was a male common pipistrelle bat, one of the more common UK bat species. Whilst the IUCN considers them to be ‘least concern’, all bat species in the UK are protected by law. Hopefully, the little guy will get better now that he’s being looked after, and we’ve donated some money to the charity.
However, we’re still not sure how the little bat got into our cellar in the first place. Though the cellar was partly open to the elements as recently as the end of 2022, we’ve since had a new window fitted and a hole fitted in, partly due to a couple of other furry rodents getting in. I suppose it could have been down there all that time and had finally run out of insects to eat. At least he’s in a better place now.