
Solar, so good

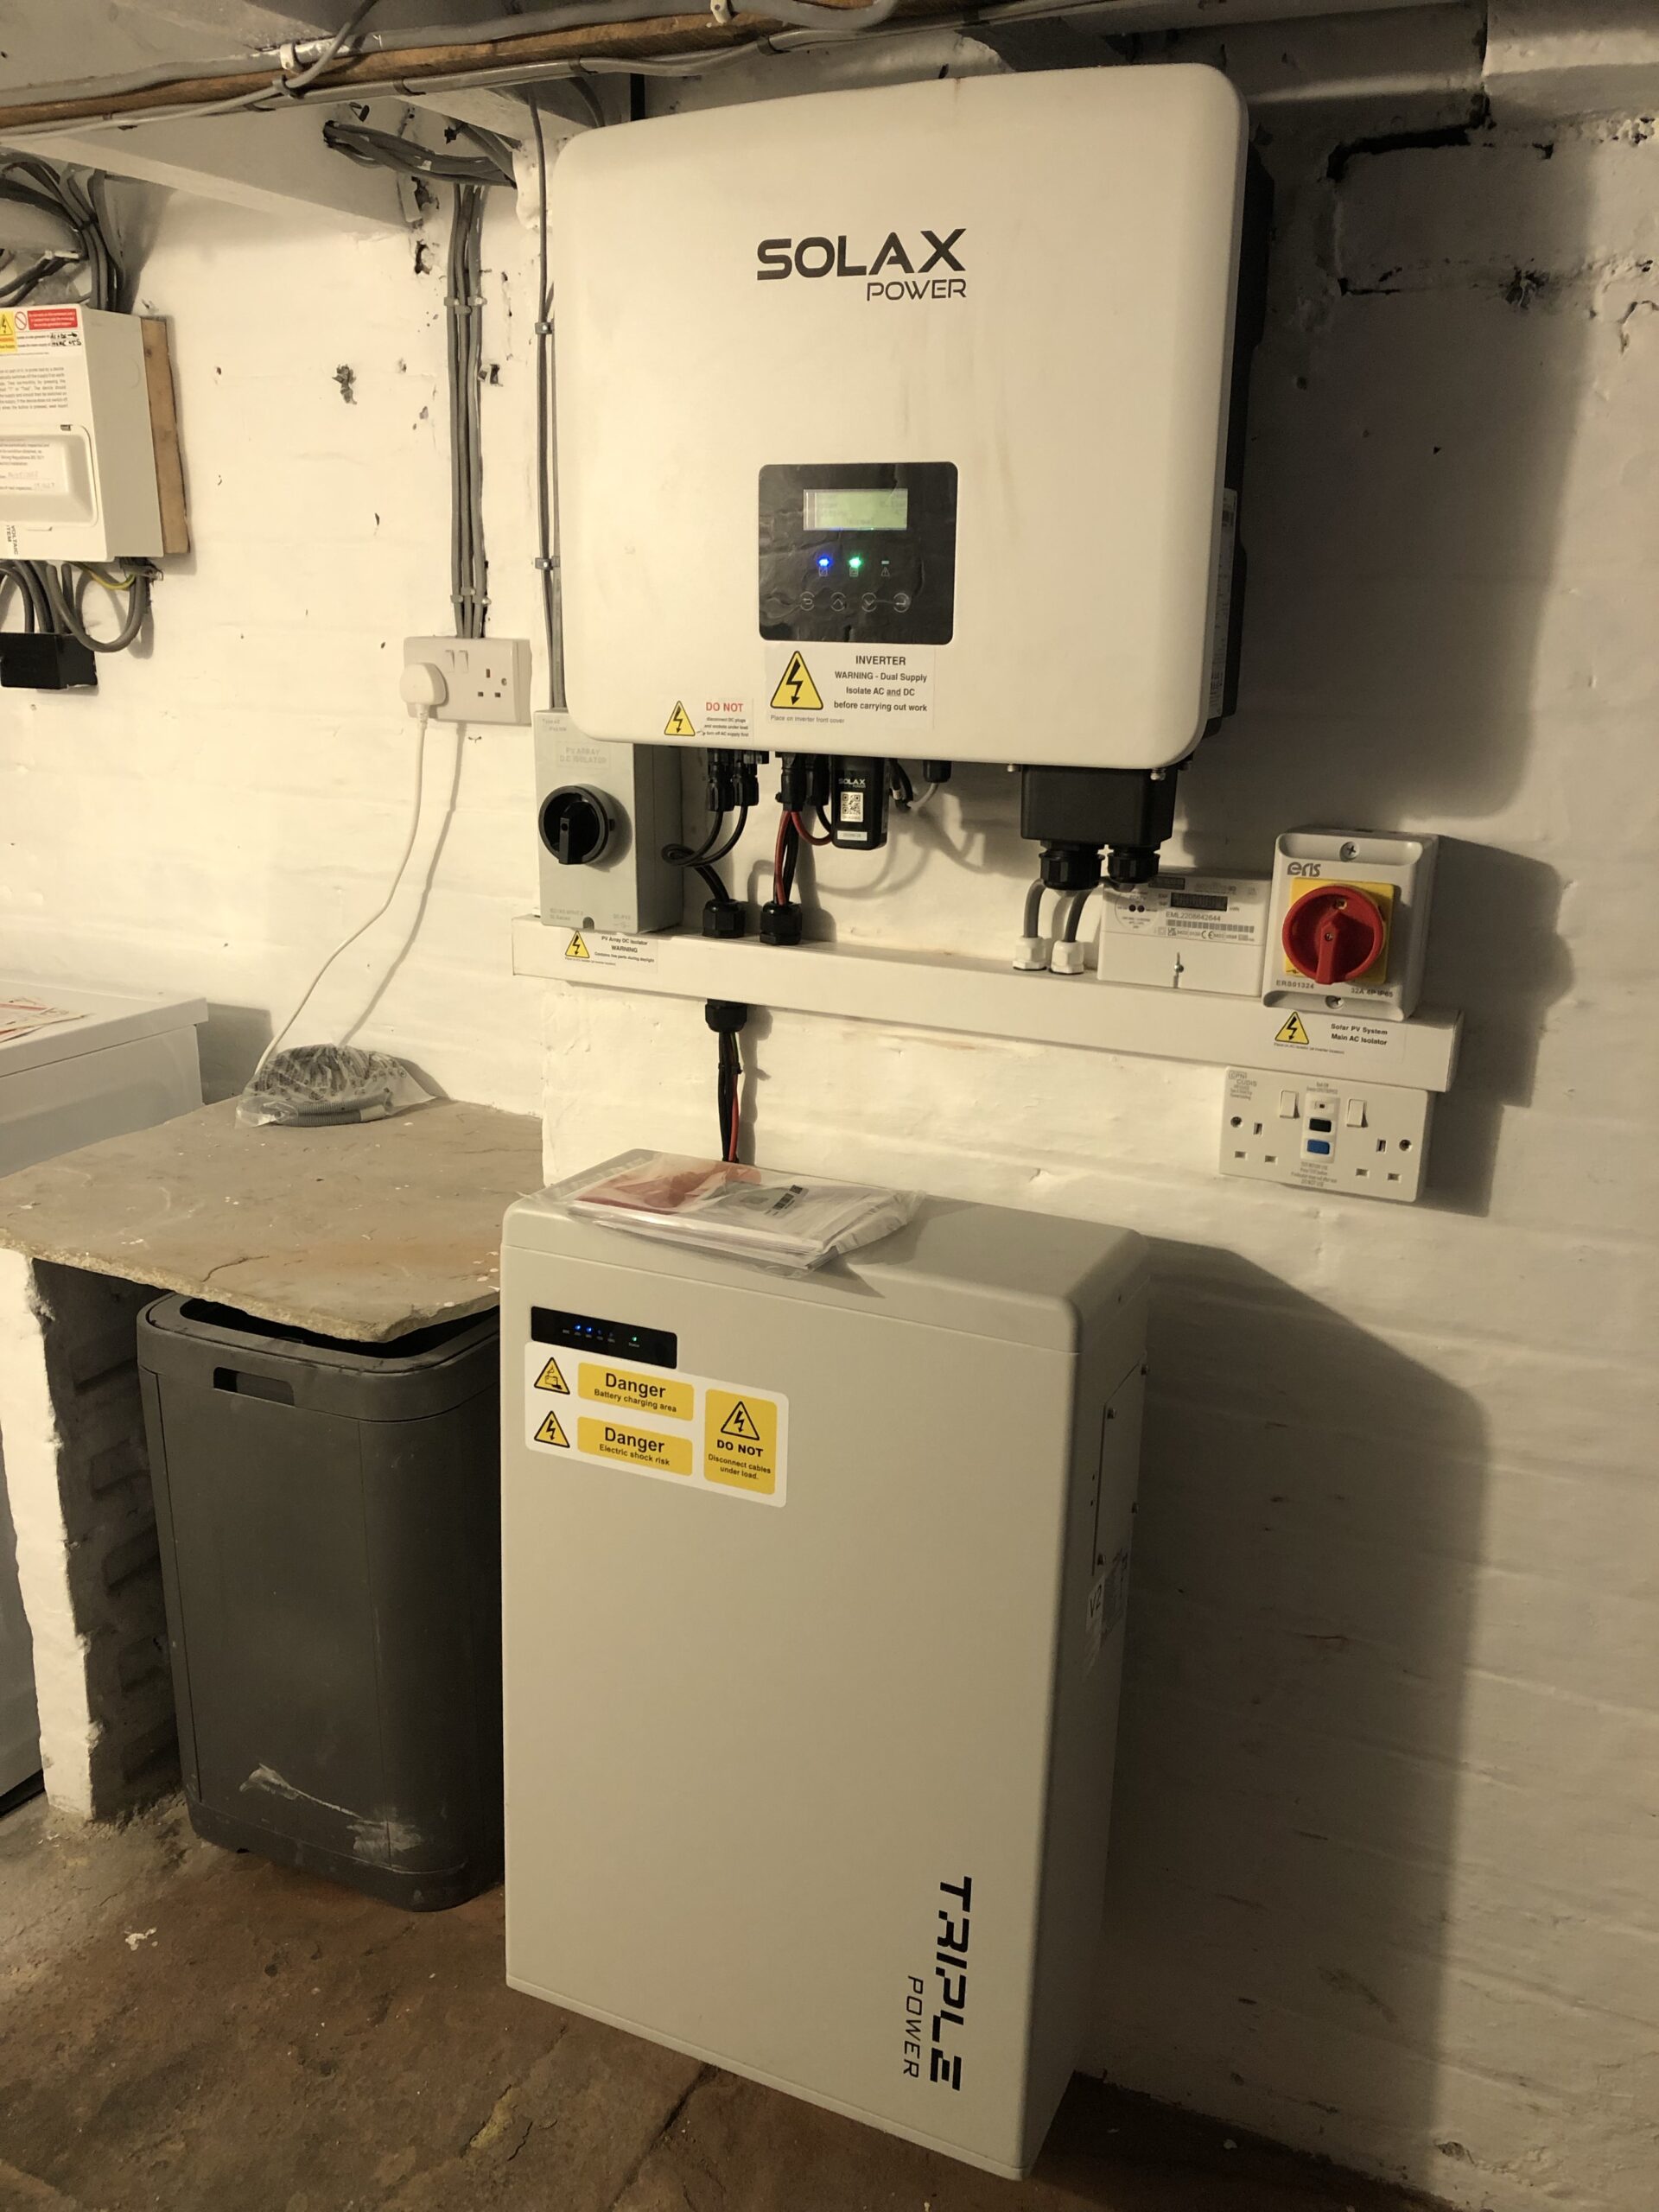
A photo of the solar inverter and battery in our cellar.

So, after spending thousands of pounds on a new kitchen, you would think that we’re done with home improvements for a while.

Erm, no. Because even though we’re not yet at the end of January, we’ve used the last of our savings, some money from The Bank of Mum and Dad, and a small amount of new borrowing to pay for the installation of solar panels.

I would show you a photo of them, but that’s hard to do without also sharing a photo of our house, which I’m loathed to do publicly. Instead, here’s a photo of the interior kit – namely, the inverter and the battery.

The battery is an optional add-on to solar systems and is designed to offer additional off-grid power at the time when the solar panels aren’t working – i.e. dull days or at night. It can store up to 6 kWh of electricity, and there’s a pair of plug sockets that are attached to the battery, meaning that we have backup electricty in the event of a mains grid power cut.

Here are our reasons for having a solar panel installation:

Saving money

Energy prices have increased everywhere recently, but especially in the UK where many of our power stations work by burning natural gas. Gas prices were already on the rise when Russia declared war on the Ukraine, and pushed prices even higher as countries started to reduce their reliance on Russian gas. So, switching to a renewable source of power that doesn’t cost money to generate (once the panels are installed and paid for) seems like a good idea.
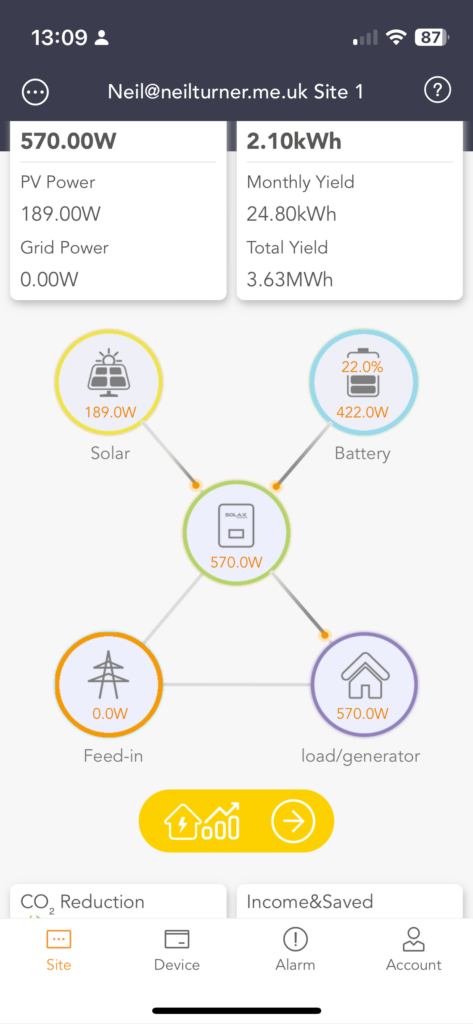
A screenshot of the Solax Cloud app on iOS, showing our solar system

January is a bit of an odd time to have them installed, though. The days are short, and we only get about 6 hours of usable daylight for generating electricity as I write this – normally 9:30am until 3:30pm. Yes, it’s light from around 8am but the sun needs to have moved around sufficiently to be shining onto the panels to get more than just a few watts of power.

Last week was very, very cold but with clear, sunny afternoons. That was enough for the panels to generate around 2.5 kW – and normally, when I’m working at home without any appliances on (e.g. washing machine, dishwasher, cooker etc.) we only use about 250 W of power. So, that’s a lot of overflow to also charge the battery and there were several days where it was fully charged at sunset. That then gave us enough power for teatime and up until beyond bedtime, meaning that we weren’t paying for grid energy.

Right now, it’s saving us between £1 and £2 per day, depending on the weather and how much energy we’re using. Our savings will increase soon, once we have our Microgeneration Certification Scheme (MCS) certificate, which will allow us to be recompensed for the excess energy that we can sell back to the mains grid under the Smart Export Guarantee. Realistically it’ll be the end of next month before this is up and running, but it means that, once the battery is fully charged, we can make a bit of money back. Not much – at best, we can earn about 16p for kWh at present, which is less than half the 34 kWh we pay to use electricity – but we would already be a few pounds up by now if it had already been in place.

The app which links to the inverter can be configured to calculate your savings, so we have an idea of how much money we’re saving.

Doing our bit for the environment

You may choose to believe that climate change isn’t real, but I’m convinced, along with something like 99% of climate scientists that it is happening. So having solar panels means that we can actually do something tangible about it. Whilst renewable energy sources are forming an increasing proportion of Britain’s mains grid energy mix, burning natural gas is still the source of the majority of our electricity, and there are CO2 emissions involved. Also, gas supplies are finite, and so regardless of whether you believe in climate change, there will come a point when we run out of gas, or have to go to greater lengths to access it. Again, the inverter’s app approximates how much CO2 we’re saving, which is over 50kg in just over a week. I reckon that’ll be half a tonne by the end of the year, which seems like a staggering amount for just one household.

We are, of course, parents, and so by doing our bit, we can show our seven-year-old that we care about the planet that they’ll inherit.

International Geopolitics

I’ve mentioned Russia’s invasion of Ukraine, and I suppose this could be a small act of solidarity with the Ukrainian people. Whilst Britain only sources a small amount of its gas from Russia, if that could be reduced to zero then that’s a lot of money that Russia isn’t getting to fuel its war machine. I’d like to think we’re helping, even if it’s only a tiny contribution.

Resilience

I mentioned above that, attached to the battery, are a pair of plug sockets which draw power only from the battery. If there’s a power cut, then these sockets will still provide power, so long as there’s some charge left in the battery. Indeed, the inverter normally avoids depleting the battery completely – typically it’ll leave 10-20% charge behind.

Even it’s sunny and the panels are generating, should the mains grid go offline (i.e. we get a power cut), then unfortunately all the regular sockets and lights in our house will go off too. But this extra pair of sockets will keep going, and so we could, for example, run a long extension cable up from the cellar to the freezer, to keep that going. We’ve had a couple of short power cuts in recent months, but these have been no more than 10 minutes at a time thankfully.

What to consider if you want solar panels

Our system cost a low five figure sum to install, and was done by a local firm. We got three quotes and all were almost exactly the same, so this seemed to be the going rate. There’s a great guide on MoneySavingExpert about whether they’re worth it, and I suggest that you also read that, as well as my own experiences.

These are things you need to consider:

  • You need a pro-dominantly south-facing roof; ours faces south-west, which is okay but not perfect. If your roofs point east or west, then solar panels probably aren’t for you.
  • You will get more out of solar panels if you can use the energy whilst it’s sunny. So, you’ll need to use the delayed start on power hungry devices like tumble dryers and dishwashers, so that you’re using them when the panels are working. If you work at home, you may benefit more, and especially if you have an electric or plug-in hybrid car that you can charge at home during daylight hours.
  • Solar panels will help with electricity, but not with your gas bill. So, you’ll get less of a benefit if you have a gas oven, or if you don’t have an immersion heater in your hot water tank. Annoyingly, in hindsight, we ripped out our hot water tank in 2016 and replaced it with a combi gas boiler, although as part of our kitchen renovations, we bought new electric hobs and ovens. Conversely, if your heating and hot water is electrically-powered, perhaps using a heat pump rather than a gas boiler, you could benefit more from solar panels.
  • In a similar vein, to maximise your savings, you may consider boiling an electric kettle for hot water for washing up, or using an electric shower to fill a bath. Using a slow cooker during daylight hours may be more economical than a cooker in the evening.
  • The return on investment period for solar panels is about 11 years, so it’s probably best to install them in a house where you don’t plan to move any time soon.
  • It’s probably best not to borrow all of the money for solar panels. Whilst you can save hundreds of pounds per year, through less usage and selling back your excess to the grid, the interest payments on any borrowings will extend the return on investment period. We’re borrowing around £4000 to fund the panels, which I’m funding using a credit card balance transfer to keep the interest down, but the rest was savings and a parental gift.
  • You probably won’t need planning permission, unless your house is a listed building or you live in a conservation area.

I’ll aim to post again in the summer, once our Smart Export Guarantee is set up and we have some sunnier weather, to indicate how much we’re saving.

The joy of having a new kitchen

Back in 2019, my grandfather passed away, a few weeks shy of his 99th birthday. Whilst he had generally been in good health, considering his age, he had been taken to hospital with an infection. My grandmother had died 10 years earlier and we think he decided that it was his time to go.

This might seem like a rather sad and confusing way to start a blog post about a new kitchen, but his passing meant that I inherited a sizeable sum of money once all of his affairs had been sorted. We used some of this money to renovate our child’s room, a small amount was invested and I used some to fund a postgraduate university course.

The rest was used to renovate our kitchen. We moved to our current house in 2015, which is an early twentieth century property that’s needed quite a bit of work over the past 7 years. We renovated all of the rest of the downstairs before we moved in – mainly out of necessity due to damp issues – but had only made minor changes to the kitchen at the time. These were limited to a new washing machine, new power sockets and a new laminate floor.

The old kitchen mostly dated from the 1950s, when what was presumably a Yorkshire Range was removed and the chimney breast covered up. It had some new units and work surface in the 1980s/90s, when the previous owners also blocked up the access to the cellar underneath. So in all it was very dated, and once the money and opportunity came to renovate it all, we decided it needed updating.

We actually started the process over a year ago, although it wasn’t until February that we paid the deposit, and work started in May. During May we had a makeshift kitchenette in our dining room – we moved the existing fridge and freezer out, and purchased an Ikea Tillreda portable induction hob for cooking, in addition to our existing Instant Pot, microwave and kettle. Between these, we could cook most things that didn’t require an oven.

By early June the kitchen was substantially finished, but some small jobs weren’t complete until September and our decorators only finished painting it last week. As it stands, we don’t yet have the replacement fridge-freezer but it’s on order and should be here by Christmas.

Here’s an overview of what we changed:

  • Opened up access to the cellar. We removed the kitchen cupboards and work surface that were built over the steps down to the cellar, and installed a new bannister. We could then move our washing machine out of the kitchen and into the cellar, where it’ll soon by joined by a tumble dryer which we’ve not had before. This also gives easier access to our gas and electric meters, which we also had replaced with smart models, and gives us more storage space. As part of this, we had the cellar window replaced (the old one was broken and not watertight) and a radiator installed, along with plumbing and electrics for the washing machine.
  • Opened up the chimney breast. Previously there were some small but deep cupboards that were where the range presumably used to be, but these were awkward to access. Instead, we’ve got two wide draws for cookware and utensils, along with the hob and recirculation unit.
  • Induction hob. Speaking of these, we ditched our gas-powered oven and hob unit, and replaced it with an induction hob and two electric fan ovens. The old cooker unit was small and only had four rings; it was actually smaller than the space allocated for it and so we must have dropped all sorts down the side of it over the years. The replacement induction hob is twice the width and has five zones. It also heats up pans much quicker, although we had to replace the majority of our cookware as many of our older pans were not induction-compatible (i.e. they didn’t have any magnetic material in them). Not that this was a bad thing – many of our pans were cheap ones bought when we were students, whereas we could afford better ones this time. Switching away from gas to electric is also safer (no naked flames) and better for the environment, although we still have a gas boiler for heating and hot water.
  • Ovens. We opted for two identical large Bosch ovens, each with a grill, rather than a unit with a large oven and a smaller combination oven/grill (I believe Americans would call the grill a ‘broiler’). These are built-in and mounted off the wall with drawers underneath, making it easier to get food in and out of them. The ovens perform significantly better than our gas oven did – much shorter cooking time, and we particularly appreciate the pizza mode.
  • Recirculation unit. Above the hobs is an air recirculation unit, which sucks up cooking fumes, filters them and then has an exhaust back into the kitchen. Ideally we would have the outlet leading outside but this is still better than before: previously, we had an extractor fan that was on one window, well away from the cooker, and it hadn’t worked for a couple of years anyway.
  • New fridge-freezer. This hasn’t arrived yet – we only ordered it last weekend – but we decided to have one large unit that would replace the existing under-counter separate fridge and freezer. Both have seen better days; the brackets holding the bottle shelf in the fridge have broken off and the plastic drawers in the freezer are cracked. Plus, it’s not great having to constantly bend down to access the fridge, so we’ve gone with a wider, American-style fridge-freezer with the fridge compartment above. It’ll also have a cold water dispenser, which will be useful for me when working at home on hot summer days. It’s a Hisense model which seems to score well in independent testing.
  • More storage. One major issue with our previous kitchen was small cupboards, which we filled before we’d even unpacked all of our cookware, crockery and food. This time we’ve gone for more storage; the centrepiece being a full height larder where we can store (just about) all of our food and drink. We also have more, bigger drawers; like with the fridge-freezer, this should reduce the amount of bending down required. The major benefit of having more storage is that we can put more things away and keep our work surfaces clear – before, we had to keep all sorts out due to a lack of space and so often our utensils would get covered in grease.
  • Easier to clean. By being able to put more things away the whole kitchen should be easier to keep clean, and we’ve gone for relatively simple fixtures to facilitate this. We’ve also gone for painted walls; before, the walls were covered in wallpaper which over time had absorbed grease and all sorts.
  • Better lighting. Previously the kitchen had two long fluorescent strip lights, although I replaced these strips with LED bulbs a couple of years ago. Unfortunately one strip stopped working, and so we had a small Ikea clip-on light to illuminate the main working area, which helped but also meant we couldn’t close the cupboard door it was clipped to. In the new kitchen, we have under-shelf lighting for all of the worksurfaces, and seven spotlights in the ceiling.
  • Two radiators. When we moved in, there was just a small electric fire to heat the kitchen; when we had the new boiler installed in 2016, we had this replaced with a standard radiator but it had to be small to fit the space. That radiator is now in the cellar; whilst its replacement is also small, we have a much larger tall radiator at the top of the stairs down to the cellar. Apart from when the oven was on, the kitchen was one of the coldest rooms in the house before.
  • New smart dishwasher. The old dishwasher that was there when we bought the house was terrible; sometimes, our crockery would come out more dirty than when it went in, despite our efforts to clean it out. We didn’t specifically ask for a smart dishwasher but our kitchen company provided one – I understand that earlier this year there was a worldwide dishwasher shortage and that’s what they could get. As with the other built-in appliances, it’s Bosch, and uses Home Connect, which is fully compatible with Alexa, Google Assistant and IFTTT. Mainly it’s useful for getting a phone notification for when it’s finished, or when the salt or rinse aid needs re-filling, and you can ask Google how long it has left. Most importantly, it works really well as a dishwasher, and we’re able to use it more extensively than the old one, including washing cookware.
  • Tumble dryer. This is actually going in the cellar, but previously we had to use a ceiling mounted drying rack for drying clothes – which inevitably ended up smelling of bacon or whatever else we were cooking as well as getting in the way. Whilst we have also bought a heated drying rack, it takes around 24 hours to dry a full load, and having a tumble dryer will help for bulkier items like bedsheets and towels. It will use more energy, but we’re using the last of our savings to have solar panels and a battery installed next month; this was another reason for switching from gas to electric for cooking. We’ve opted for a Grundig dryer which is a heat pump model, and therefore has much lower running costs than condenser models.

We have had to make some compromises with the new kitchen, which is namely work surface space. To be able to fit in access to cellar and the larder, we have significantly less work surface available, but the extra storage means that we can actually keep what we have clear and so the amount of useable space is about the same as before. And as mentioned, we had to buy new pans from ProCook, but those that we’ve bought are a significant improvement over our old pans anyway.

It’s been a long journey, but by Christmas it should all be finished. Back in March I actually made a short video listing all the things that we hated about the old kitchen and how we’re addressing them, which informed this blog post. We’re very lucky that we inherited enough money to be able to get a kitchen which better suits our needs; it not only looks good but also works for us. I hope my grandfather will be happy with what his inheritance has allowed us to get.

We still have more work to do on the house; the downstairs is almost done but two of the three bedrooms need work in time, as does the stairwell and upstairs landing. We’ve done some redecorating in the bathroom which has made it look less 1980s but eventually it’ll need replacing. I’m hoping that we’ll be able to save some money once the solar panels and battery are installed next month.

Home improvements

We bought our first home back in 2015, when my wife was pregnant. The house we bought is one that estate agents would describe as ‘having potential’. That’s not to say it was derelict, but it had dated decor and needed a lot of work doing.

We spent much of 2015 renovating the downstairs rooms – new plaster on the walls, new electrics and fixing various issues which meant that, whilst we got the keys in June, it was October before we could finally move in. In 2016, we converted a newly-partitioned room into a downstairs toilet, and had a new central heating boiler fitted.

Progress with renovating the rest of the house slowed down after this. Working full-time and having a child meant that we just didn’t have the time, and money was also an issue. But then in 2020 I inherited a sizeable amount of money from a deceased relative, and so we were able to start work again.

Whilst we had done a lot of work downstairs, the upstairs rooms had remained pretty much as before. Of the three bedrooms, the one we had earmarked for our child needed the most work, so this is the first of the bedrooms to be renovated. As with the downstairs rooms, it was a big job.

Firstly, there was a large, built-in wardrobe which had to be removed – it was falling apart anyway, and it was partly there to house a water tank which was removed when we had the new boiler fitted. Once that was out, and after stripping the wallpaper, it became clear that re-plastering was necessary here as well. We also needed new wiring – before, we only had two single plug sockets for the whole room – new floorboards, and some central heating pipes needed re-routing. Thankfully, we were able to employ a builder who could do all of this for us.

The room now looks totally different; as with downstairs, we’ve gone for painted walls rather than wallpaper. We’ve also decided to have the floorboards varnished and put rugs down, rather than carpets, so that the room can more easily evolve with our child’s changing tastes as they get older. And it’s a more flexible space, with more options for where the bed can go.

This year, we’re renovating the kitchen. I’ll write more in detail about this later, but again, it’s a big project. When we moved in, we didn’t do much work on the kitchen, compared to the other downstairs rooms – just a few extra plug sockets and a new floor – but this time it’s a total renovation. It also includes opening up one of our cellars as a utility room.

There’s still more work to be done elsewhere – the bathroom needs renovating as well, as again we only did a small amount of work when we moved in. And the other two bedrooms could do with a refresh. We’ll need some more money first though.

Koopower Wireless Doorbell review

A photo of the Koopower wireless doorbell and the two plug-in receivers

I was recently sent a wireless doorbell from Koopower (Amazon link) to review.

Like with most wireless doorbells, this Koopower kit has a transmitter bell to attach by your door, and a plug-in receiver that plays the chime. What sets the Koopower kit apart is that the transmitter doesn’t require any batteries.

A photo of a Koopower wireless doorbell mounted next to our front door

The energy required to transmit the signal is generated by the action of pushing the button. This gets around one of the major problems with traditional wireless doorbells – knowing when the batteries are flat. Short of testing your own doorbell regularly, you run the risk of someone pressing the button and there being no chime, even when you’re in.

The Koopower kit I received contained two receivers, which is useful; I have one downstairs and one upstairs. Our house is quite long with thick walls and in the past I’ve struggled to hear our previous doorbell.

Pairing them with the transmitter was straightforward, and the transmitter includes a double-sided sticky patch for attaching to your wall/door. Compared to my previous wireless doorbell, installation was really easy.

Once installed, a couple of buttons on the receivers let you control the volume, and choose one of 25 polyphonic ringtones to play. I stuck with a simple ‘ding dong’ sound, which is the default. The receivers also flash an LED when they ring.

Whilst more expensive than other wireless doorbell kits, the Koopower system gains points for its incredibly simple installation and offering two receivers. It’s not a smart doorbell system like Ring (Amazon Link), so it won’t link to your phone. But it does well for a basic doorbell system that requires minimal maintenance.

Nesting

A photo of our Nest thermostat with the heating set to 19 C

Along with our new boiler, we also got a new thermostat – a Nest Learning Thermostat. I’d actually bought it in January, in the hope that it could be fitted to our existing 1970s central heating system. With both Christine and I being on maternity and paternity leave respectively, we were at home most of the day and so the heating was on almost constantly – I hoped that a better thermostat would cut the amount of energy required. Alas, the fitter who came to install it told us that our system was too old – he could fit it, but it would only power either the hot water or the heating, and not both at the same time.

Now that we have a more modern boiler, we could also make use of the new thermostat.

The previous thermostat also dated from the 1970s and was a basic model that, theoretically, would heat the house until it reached the set temperature and stop. But I’m convinced that it didn’t do the latter – the heating would still be on even when it was utterly roasting. With such an old system, the fault could have been in any one of several places. Either way, it’s not an issue now.

Whereas the old thermostat was upstairs, we’ve fitted the Nest in the dining room. You can install it using the standard thermostat cables to your boiler, or there’s a micro-USB socket and an AC adaptor included. We decided to go for the latter, in case we want to move it somewhere else. It’s quite easy to fit to the wall and the backplate even includes a spirit level to help you align it correctly.

The Nest offers several useful features:

  • It learns how long your heating system takes to warm up. So if you want the house to be warm by 7:30am, you tell it that, rather than telling it to come on at 7am in the hope that your house will be warm enough by then.
  • You can tell the thermostat that you are away, allowing it to maintain the house at a cooler temperature, thus saving energy.
  • Your thermostat can be managed using official apps for smartphones or tablets, or on the web.
  • It has a motion detector, so the display turns off when no-one is about. It can also turn your heating down if it detects no motion in the house for some time.
  • Integration with IFTTT and other smart home technologies.

Whilst it’s been a warm couple of weeks, thanks to the Nest our heating has only needed to be on for an average of 30 minutes per day. I’m hoping that it will save on our energy bills – my mother-in-law has one, and she credits hers for halving her gas bill.

New boiler

A photo of our new Bosch boiler in our kitchen

In addition to a new downstairs bathroom, we’ve also invested in a new central heating boiler for our house.

This was mainly a necessity, rather than a desirable enhancement. The existing boiler dates from 1976, making it 40 years old. This is far older than most boilers – by comparison, my parents have had their boiler replaced twice in this time. If it broke down, I doubt we would have found anyone able to fix it. In which case, we would have needed a new boiler anyway, so we might as well get a new one at a time that’s convenient for us. With Christine still on maternity leave, and the weather warming up, last week seemed like a good time to do it.

The old boiler was a so-called ‘back boiler’, located in one of the chimneys in the house and with a gas fire in front; there were also two other gas fires in the house that we had removed in the summer. We also had a large hot water tank upstairs in what will be Elizabeth’s room.

Boiler installation

The new boiler is a combination boiler that provides both heating and hot water, so the old boiler, hot water tank and gas fire were all removed as part of the works. Additionally, we had to have the boiler in a different place, as it wouldn’t have fitted in the chimney and would’ve been awkward to access even if it did fit. So it’s now in the kitchen.

As it’s a newer-style condensing boiler, it should use significantly less gas than the previous boiler. Which is good – we spent a fortune over the winter as Christine was at home all day with Elizabeth during the coldest months of the year. It’s manufactured by Worcester-Bosch – one of the better makes and comes with an 8 year guarantee. There’s also a filter, to remove impurities from the water in the system, thus pro-longing the life of the boiler – that’s the black thing on the pipes in the photo.

Cost

We got two quotes for the work. The first was our current energy supplier – a large British firm specialising in Gas, who quoted us over £6000 for the work. Thankfully a local firm quoted us less than £4000, so we went with them. They managed to do the job in two days, rather than three, and we got an interest-free credit deal for two years.

As well as the new boiler, we also got a new thermostat (more on that later), and four new radiators in the downstairs rooms. One of these, in the kitchen, replaced a hugely inefficient electric radiator; the others replaced existing radiators that were removed and stored during our earlier renovations, but haven’t worked well since they were reinstalled.

Whilst the work has been costly, I’m hoping it will pay off in terms of lower gas bills, and should mean that we’re not stuck with a broken boiler in the middle of winter.

Making a house a home (part VIII)

A photo of our new downstairs bathroom

It’s been a little while since my last update on renovating our house – January to be exact. We’ve actually been spending time working on other peoples’ houses in the meantime – my mother-in-law needed her hallway repainting and we returned a favour by helping a friend who helped us a lot last summer.

The big change is in ‘the triangle room’ – for context, see this blog post from September. We’d always intended for this to be a downstairs cloakroom with a toilet and washbasin, and, now it is. We bought the toilet, washbasin and a matching tall cupboard from a local bathroom store at a decent discount, and then got a local plumbing firm to fit it. The main aim of this is to allow my mother-in-law to visit – she’s disabled, and can’t get upstairs, so having a downstairs facility will mean that she can finally come and visit us. For this reason, we’ve bought a taller toilet.

Alas, we can’t use any of it yet. The location of our sewerage pipes means that we’ve had to have an electronic macerator fitted, and that still needs to be wired in. And when that’s done, we’ll need to be very careful about what actually gets flushed down the toilet.

The rest of the room needs finishing off – there’s no paint on the walls, no floor covering and no tiling around the washbasin – but we’ll get to these jobs in time. We’re also looking at buying some more wall-mounted cupboards, so that we can carry on using the room as a storeroom – albeit, a more tidy one.

Making a house a home (part VI)

A photo of our dining room

Well, we did it – we’ve finally moved into our new home, at long last. About 99.5% of our possessions are here with us too, with just a handful of things still in our flat. We moved the bulky items last Sunday and so we have been living in the house for the past week.

We also now have a laminate floor in the kitchen, dining room, hallway and living room, which was fitted on Monday. It looks great, and is a huge improvement over the old carpet that was down when we moved in.

We’re now at the stage where we can finally get coloured paint on the walls. So far, just the one wall in the dining room has been painted, and we’ll be doing the same with the living room. These are the walls where the radiators will go, and as it’s now October and beginning to get cold, we’d like to get the radiators back on the walls as soon as we can.

Finally, we’ve given notice to end our tenancy agreement on the flat, so we’ve been focussing on getting that clean. The contract expires in a couple of weeks. It’ll be nice to only have to pay bills for one house.

Making a house a home (part V)

A photo of a hole in the floor that has been filled with mortar. It's in a corner surrounded by skirting boards

We’re making some more progress with the house (here’s the previous update). The big news is that we will, finally, be moving in next weekend.

This is partly because all of the main jobs are done, but also because we’re basically broke. Trying to run two houses for four months has been very expensive, and the longer we stay in the rented flat, the more money we’re throwing away. In hindsight, the £2000 or so that we’ve spent on rent in that time could have been better spent on getting professionals in to move things on a bit quicker, but never mind.

The main bit of work that I have done is filling in holes in the dining room floor. Unlike other rooms in the house, the dining room has a solid floor, but there was a channel along the back wall which originally housed a gas pipe. That’s been removed, as after we took out two of the gas fires it became redundant, but it left a long gap between the floor and the skirting board, and quite a deep hole in one corner. I’ve filled it all in with mortar; this was the first time I’ve ever done such a job and actually I’m quite impressed with the result. The photo was taken just after I had put it down, but now that it’s dried and I’ve sanded down the rough edges, it looks just like the rest of the floor.

However, it won’t be there for much long as we are having laminate floor laid over the top next week. This will be after we’ve moved in so we’ll have to limit how much stuff we have downstairs.

Having a car has meant we’ve been able to take more of our belongings over and we’ve probably moved at least a third of the contents of our flat now. The big stuff remains, until the weekend when we’ll (hopefully) have some help shifting things.

It’ll good to finally be able to live in the house after all this time.

Making a house a home (part IV)

Back in mid-July, we anticipated that we’d be 6 weeks away from moving in to our new house. Well, it’s been more than six weeks and we’re still not in.

We haven’t hit any major snags but August has been a busy month for us (as evidenced by the lack of blogging) and so we haven’t progressed as much as we’d hoped. Here’s an update:

Plastering

The damp-proof plastering dried out mid-August, and so we have the first two coats of paint on the walls in the dining room. I’ve also been able to patch up some bits around plug sockets (for example) that weren’t quite finished to how we’d like.

I also mentioned last time that we needed some extra bits done – we had a builder in last week, who did these for us. So, the plastering is all done now, and we just need to wait for all of the new plaster to dry out. This means that we’ve finally had all of the holes from the old plug sockets filled in.

Bathroom

The bathroom was the one upstairs room that we planned to decorate, and also the one with the least amount of work required. However it ended up as a lower priority when we realised how much work the rooms downstairs would be. Anyway, we’ve got on with the painting in here and it’s basically done, but needs a little touching up to make it tidy with clean lines. The floor also needs a serious clean to get the paint splashes off, but otherwise, the bathroom is pretty much finished now.

Flooring

The living room, dining room and hallway all originally had the same dark blue carpet. We had to take this up as part of the re-plastering work, but we’ve decided to get rid of it. This is mainly because the new plaster is actually thinner than the old, so the dining room floor in particular now has a very slightly larger surface area – and so the carpet no longer fits correctly. We’ve instead decided to get oak laminate floor, with the same pattern across the kitchen, dining room, hallway and living room. The new flooring has been ordered and paid for, but we’re awaiting the last few bits to be delivered before it’s installed. As for the old carpet, a friend of ours took it off us for nothing for use in her house, which is great as it would have probably cost us money to dispose of.

‘The Triangle Room’

Beyond the living room is a room we’ve been calling ‘the triangle room’, as it’s roughly triangle-shaped. I assume it was originally part of what is now the living room as it’s separated by a comparatively modern stud wall. This part of the house used to be a shop, and the window in this room used to be full height. It’s been partly bricked up, but only on the outside, as we found when we took a bit of plasterboard off behind the radiator and opened up a void below the window.

I mentioned that we’ve had a builder in – he’s filled the void with insulation and covered it with some new plasterboard and plaster that is flush with the rest of the wall. We’ve also had an additional stud wall and door fitted in the room, as shown in the work in progress photo at the top, as eventually this will become a cloakroom with a toilet and washbasin. This probably won’t happen until after we’ve moved in as we’ll need to save up some more money first. It’ll also need flooring putting down, but again, after we’ve moved in.

Painting

We’ve started painting the dining room, as mentioned, and once the rest of the plaster is dry (which should be in the next couple of days) we can paint the living room as well. We’ve bought all of the paint already – the dining room is being painted green, and the living room a kind-of chocolate brown.

Exterior building work

We had two gas fires that we didn’t want, which both had external flues. Having removed these, we got the builder to fill in the holes in the external walls. He’s done a great job and it’s actually hard to see where the holes were originally. When the mortar dries, it’ll be almost impossible I reckon.

What’s next

We’ve not got many jobs left now. The flooring needs to go down, and we need to re-hang some skirting boards and lift some gripper rods that were left over from when the carpet was down. After that, it’s basically just painting, and then we can move in. Whilst this won’t be the end of the house renovation project, we’ll have done the most disruptive work before moving in. If all goes to plan, we’ll be living in the house by the end of the month.

Creative Commons License
Except where otherwise noted, the content on this site is licensed under a Creative Commons Attribution-ShareAlike 4.0 International License.