Phomemo D30 Bluetooth Label Printer review

A photo of a Phomemo D30 Bluetooth Label Printer

We’ve had this little Phomemo D30 Bluetooth label printer (sponsored link) for about 3 1/2 years now, and it’s a fab little gizmo.

It lets you quickly print labels from your phone, with text or emojis, using the Print Master app. It’s quick, as it uses thermal printing in the same way that receipts are printed in shops. The label printer itself is also quite compact – about the same height and width as a smartphone, but about twice the thickness. It comes with a built-in rechargeable battery, and a micro-USB port for charging. There’s a variety of colours to choose from – we have a ‘green’ one that’s more turquoise, but they come in pink, purple, grey and a cheaper all-white model.

The Print Master app is relatively easy to use. You select the size of label to match, type what you want and add any emojis. There are also templates that you can use, and a variety of fonts. When you’re ready to print, you can select the number of copies, and it’ll pop out of your printer in a couple of seconds.

We’ve used our label printer extensively since we bought it. It was especially useful in our new kitchen as it meant that we could label boxes of things in the cupboards. We also use it on a regular basis to label leftovers before they go in the freezer. It’s easier and neater than writing labels by hand.

ThermoPro TP357 Bluetooth thermometer review

A photo of a ThermoPro TP357 thermometer showing the current temperature of 17.5℃ and humidity of 59% on a LCD display.

I have an upcoming project for Home Assistant which means that I need to be able to measure the temperature in our bedroom. As part of this, I’ve bought a couple of ThermoPro TP357 Bluetooth thermometers from Amazon (sponsored link). One is for our bedroom, and the other is for our eight-year-old’s bedroom which tends to get a bit cold in winter.

I specifically went for these thermometers because they’re:

  • Cheap – I paid £19 for the pair last week, but they’re £16 for the pair as I write this.
  • Supported by Home Assistantthere’s an official integration.
  • No extra hardware required – because they’re Bluetooth, and I run Home Assistant on a Raspberry Pi with a supported Bluetooth chip, there’s no additional hardware required to get the two to talk to each other.
  • Probably good battery life – Bluetooth is quite energy efficient when compared with, say, Wifi, and so the batteries should last longer.
  • No need to use the cloud – all the data can be stored locally on Home Assistant.

ThermoPro TP357 look and feel

The ThermoPro units are smaller than I expected. They’re about as tall as a credit card but roughly square, so they’re narrower than a credit card. Each one runs on one AAA battery which is provided. On the back is a flip out kick-stand, a magnet and a hook, so you can wall-mount it, stick it to your fridge or have it free-standing on a shelf like I do. There’s also a button on the back that switches it between Fahrenheit and Celsius.

On the front, there’s an LCD screen which shows the current temperature and humidity level. There’s also a face pictogram – it’ll smile when the humidity is between 30-60%, frown when it’s less than 30% or show a neutral expression if it’s over 60%.

Home Assistant integration

If you have Bluetooth enabled on your Home Assistant device, then a few minutes after you put the battery in, Home Assistant should pop up a notification to say it’s discovered a new ThermoPro device. You’ll just need to confirm that you want to set it up and allocate it to an area, and you’re done.

As you would expect, the ThemoPro integration reveals entities for temperature and humidity, but also the battery level. I’m not sure how accurate this is, as both provided AAA batteries just show 50%. I’ve added these to my Home Assistant dashboard, and have set up some additional functionality that I’ll blog about later. Mainly because, despite allegedly being ‘summer’ in the UK right now, it’s not been warm enough for me to test.

The range seems quite good on these. ThermoPro claim that there’s an 80 metre range in direct line of sight. There’s a few thick walls between my Home Assistant device and the thermostats, and one that is around 5 metres away doesn’t have great signal strength but it’s enough.

ThermoPro app

Of course, ThermoPro expect you to use their app for iOS and Android. This includes logging of up to a year’s data, and you can set notifications based on events related to the humidity and temperature. Well, that’s what it says – I haven’t actually installed the app. I’m not yet sure if it’s possible to have the app and Home Assistant communicate with the thermostat at the same time. But theoretically, anything the app can do, Home Assistant can do too.

Alternatives

I’ve had various Facebook adverts for alternatives to these. Some have e-ink displays, which are more readable at a distance, or use different protocols to Bluetooth. But they’re all more expensive. These two seem to do the job well and are small and cheap. Plus, it should be quite a while until I need to replace the batteries.

One mouse to rule them all

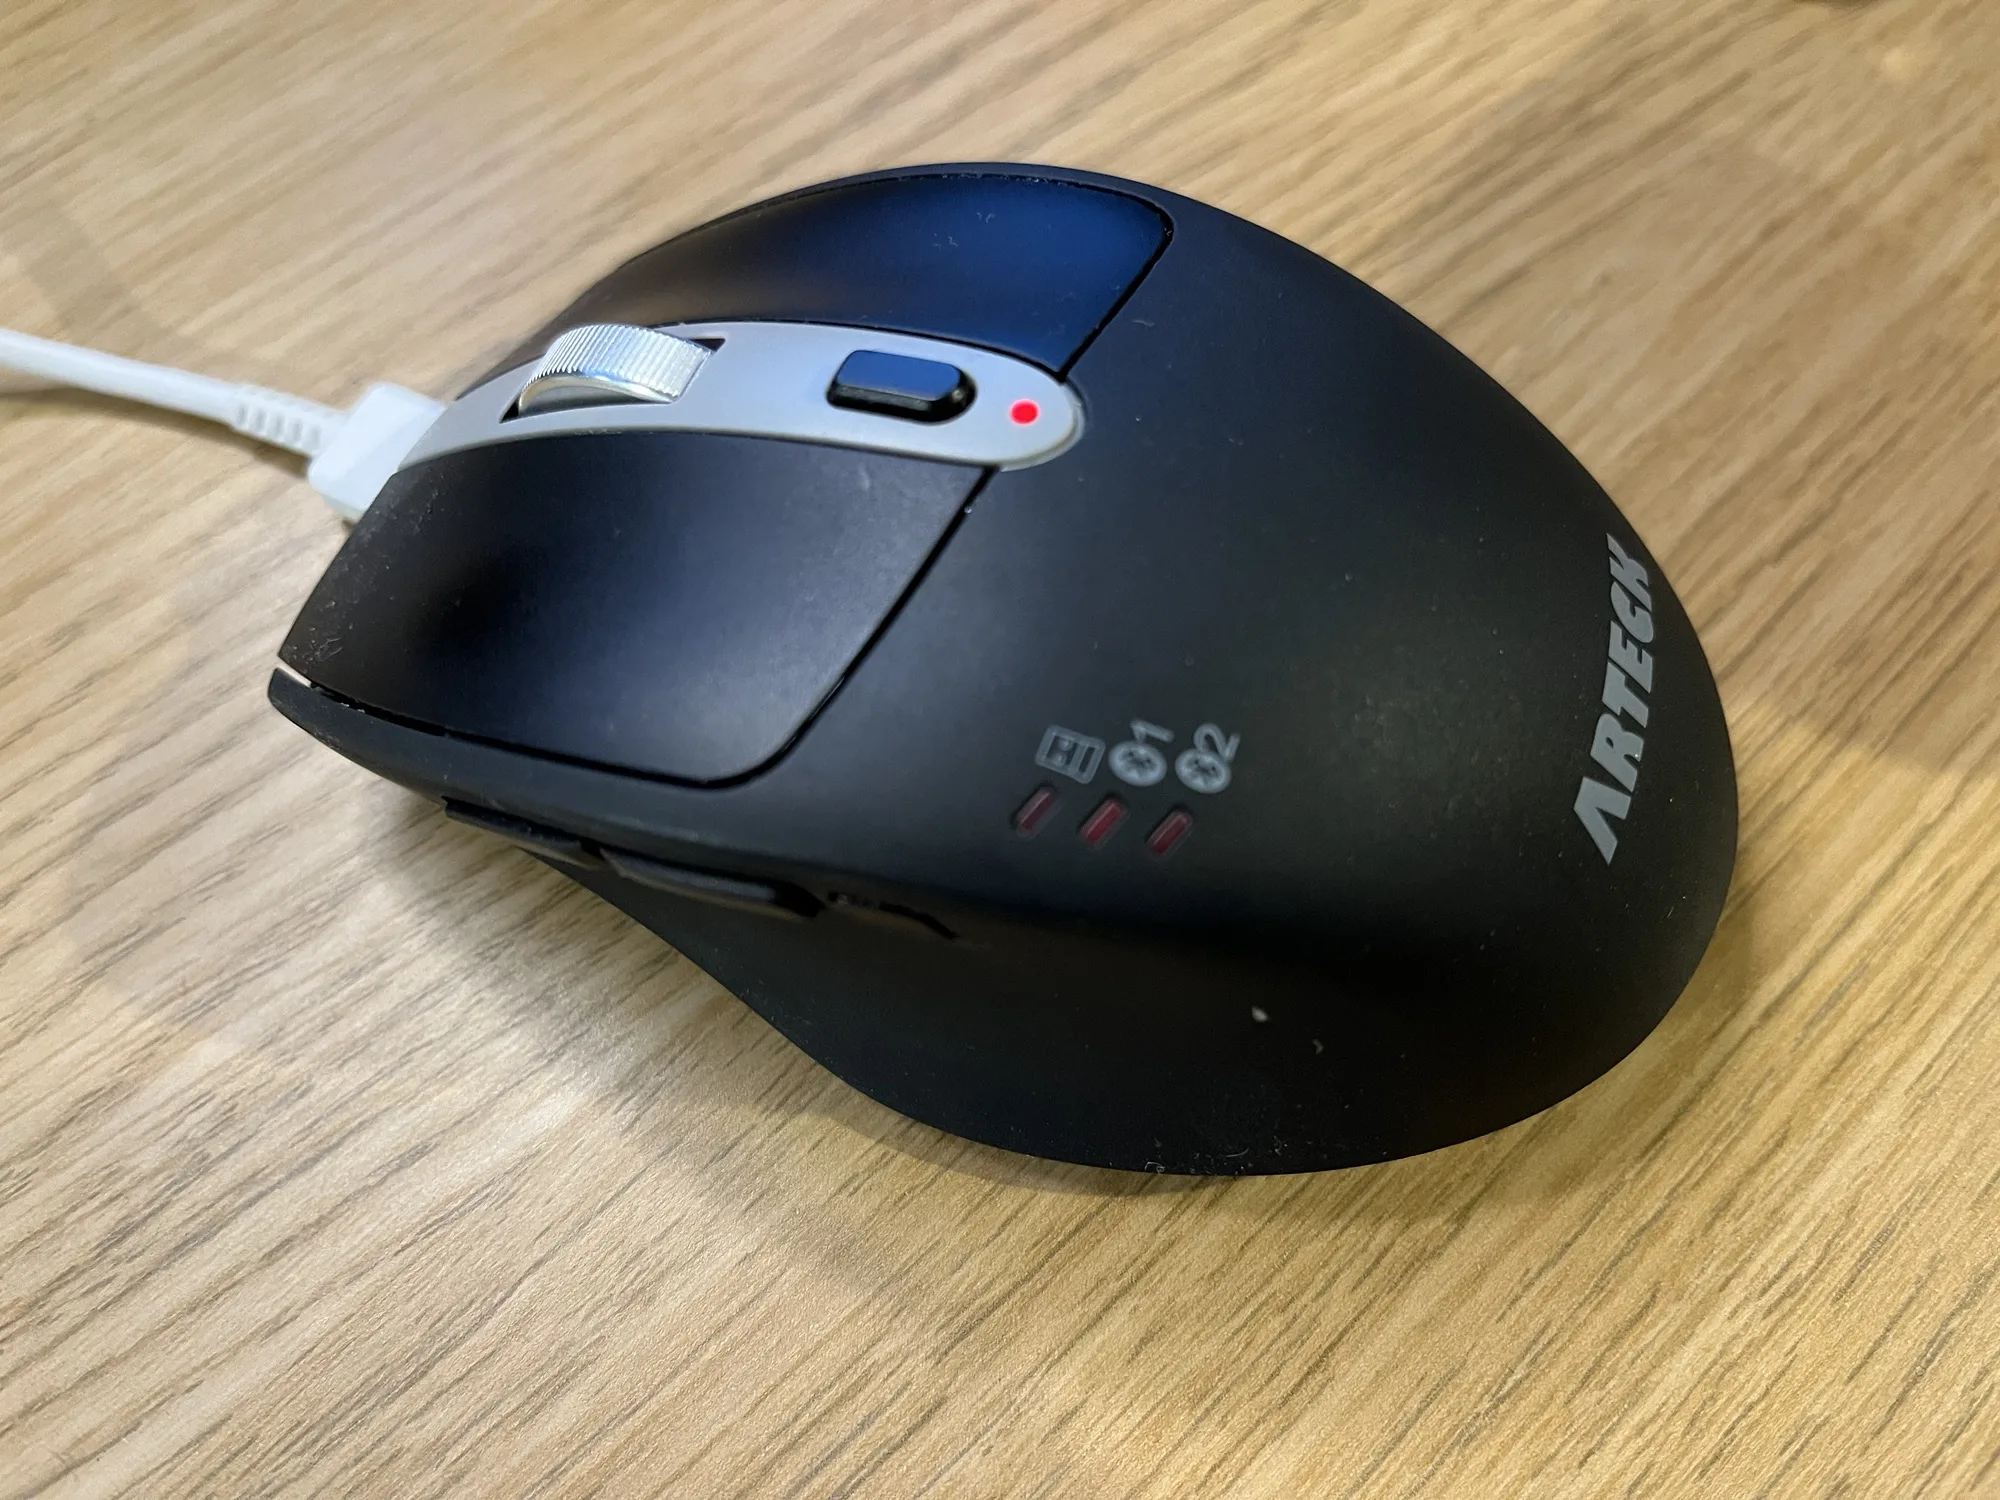
A photo of the Arteck multi device Bluetooth wireless mouse

Back in September 2002, I bought this multi-device Bluetooth mouse from Amazon (sponsored link). As a multi-device mouse, it can be used to control three separate devices.

I bought it so that I could use it both with my desktop, and my iPad – because yes, you can use a mouse with an iPad. It supports two Bluetooth devices, and can connect to a third using an RF USB dongle. I use the dongle with my desktop, as RF uses less power. Switching devices is as simple as pressing a button on the side.

As a mouse, it works quite well – clicking is quiet, and I’ve been using it for almost 18 months with no complaints. It’s a comfortable size too – not as big as some mice, but larger than some laptop mice. However, this model is designed for people who are right handed; I had a look for left-handed multi-device mice on Amazon but couldn’t find any.

The battery life is also really good – I recharge it about every three months. It has a built-in battery which charges using a USB-C cable, and this plugs in at the top so that you can still use it whilst charging. This makes it better than Apple’s Magic Mouse, which has its Lightning connector on the bottom and so can’t be used while charging. The USB-C port is just for charging though; it won’t turn your mouse into a wired mouse. There is also a small slide-out compartment to store the USB RF dongle if you’re not using it.

As well as the device switch button on the left side, there are two additional buttons which, by default, act as back and forward buttons in a web browser.

Whilst I’m sure there are other multi-device mice out there, this suits my needs and has worked well for me. It’s reasonably priced at around £19, at time of writing.

mPow Magneto wireless Bluetooth headset review

A photo of a mPow Magneto wireless Bluetooth headset

When my latest set of headphones stopped working in one ear, thanks to a loose connection in the jack, I decided that it was probably about time to get rid of the wires altogether and go wireless. I’d previously tried some cheap no-brand Bluetooth headphones in 2014, which were terrible – a non-standard charger cable, poor sound quality and cheap plastic-y construction. I think I used them once – I’d bought them for the gym but then stopped going and haven’t been back since.

After browsing through Amazon, I came across these mPow Magneto headphones. The reviews were generally good and they ranked as the number best-seller in wireless headphones. I purchased them for £16, but at the time of writing they’re selling for less, making them a bargain.

The headphones aren’t completely wireless – there’s a flat wire between the two earpieces which also has a remote control on the right side. But they’re less prone to tangling than regular wired headphones and you can run the wire behind your neck. The ‘Magneto’ name refers to the magnets in the earpieces – you can attach them together and wear it as a sort of necklace when you’re not listening to them.

The remote control has volume control buttons, and a general purpose button used for turning them on and off, and for pause the current playing track. There’s also a microphone, and when paired with a phone you can use it to make and receive telephone calls. The right earpiece has a micro-USB port for charging – a full charge takes about an hour and gives around 8-10 hours of music playing in my experience.

Pairing with your device is straightforward, and if your device supports the Bluetooth Battery Service, you’ll be able to see how much charge your headphones have left. My iPhone 5S supports this; when connected, the Bluetooth icon in the top right gains an additional battery indicator and a new ‘Battery’ widget appears on the Today pull-down. The mPow Magneto will also play an audible warning every 5 minutes once you get below 30% battery remaining.

Sound quality is pretty good – decent bass and reasonable clarity. Audiophiles will probably want to spend more on something better, but I was pleasantly surprised – I’ve used wired headphones with worse sound quality before. Although sometimes radio interference affects the range – the sound can become choppy if your device is more than a foot away from your headphones, but it depends where you are. Other times it can be a couple of metres away and be fine.

Going wireless does have its downsides. As far as I can tell, you can only pair your headphones with one device at a time, whereas you can plug wired headphones into any device with a 3.5mm audio jack. Although you can use the headphones whilst they’re charging, you may have physical difficulty getting the right earbud to sit in your ear as you do so. Plus, the need to recharge your headphones once or twice a week may put some people off, as will the extra battery drain on your phone or device (especially if you normally have Bluetooth turned off). But not having to unknot wires that then dangle and pull when running is quite liberating.

There are better headsets out there, if you’re prepared to pay more. But the mPow Magneto is fantastic value for money and gets my recommendation. I use them daily and have been really impressed with them.

New post on Medium: Bluetooth on iOS

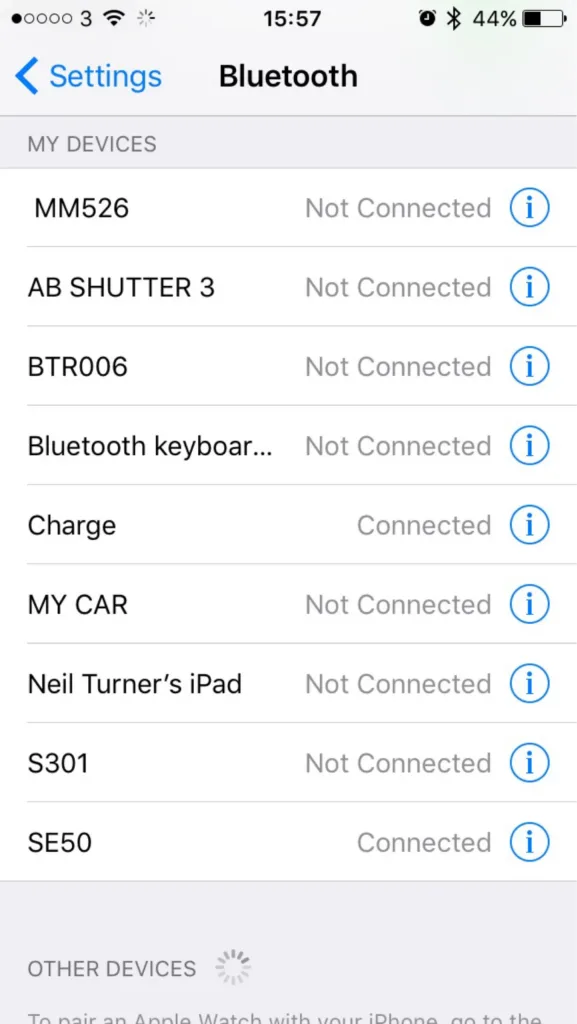
I’ve written another post on Medium. It’s just a short two-minute read, but covers an issue I’ve been experiencing in iOS as I’ve amassed more Bluetooth devices: how on earth do you work out which one is which when they’re all called things like ‘SE50’ and ‘MM256’?

I’ve chosen to post it on Medium in the hope that it might get exposed to a slightly larger audience than usual. I think my previous piece on Medium got a little more exposure than it would have done normally – it didn’t exactly ‘go viral’ but I get the impression that more people saw it than if I had just posted it here on my blog.

If you enjoy my Medium pieces, then please ‘recommend’ them.

Here’s why friendly names are needed for Bluetooth devices on iOS

How many Bluetooth devices have you paired with your iPhone or iPad? Go on, have a look.

Okay, now go through each device and tell me what each one is. Because, if your list is anything like mine, you’ll struggle to identify each device from its name.

For reference, I’ve included a screenshot of the nine devices that are paired to my iPhone. In that list, there are:

  • Three Bluetooth speakers
  • One set of Bluetooth headphones
  • A Bluetooth camera remote
  • My iPad
  • A Bluetooth keyboard
  • My Fitbit
  • My car radio

The iPad is obvious, as is my car stereo and the keyboard. My Fitbit appears as ‘Charge’ as it’s a Fitbit Charge, and the camera remote is called ‘AB SHUTTER 3′ – close. For the remaining devices, without knowing the model numbers, or a process of trial-and-error, deducing which is which presents a challenge.

My iPad lets me change the name that appears to other devices, as do most phones or computers. But a cheap off-brand Bluetooth speaker doesn’t, especially as there’s no visual interface. Sure, you could probably re-program the device if you took it apart and hacked the firmware on the Bluetooth controller, but that’s beyond the capability of your average user.

It would be nice if users could assign a friendly name to these devices. ‘Waterproof speaker in shower’ is more meaningful to me than ‘MM526′. ‘MY CAR’ is all well and good but what if I had two cars?

It wouldn’t need a major change to the user interface of iOS. There’s already an ‘i’ icon next to each entry on the list – presently, this goes to a mostly blank screen with just a ‘Forget this device’ button. An extra field to add/edit a friendly name for the device is all that would be necessary. Doing so would improve the usability of Bluetooth on iOS significantly.

With the Emoji keyboard enabled, it would even be possible to add a pictogram to each friendly name. Instead of ‘MY CAR’, I could have ‘🚘 My BMW’, for example.

I understand that users with jailbroken devices can already do what I’m proposing. But jailbreaking isn’t an option for many, and so I’m hoping that someone at Apple will consider adding it for all users.

With iOS 9 now out, Apple must be planning for iOS 10 – this would be a really helpful little feature to include. I’m no programmer, but I can’t see it being too difficult, and it would be a small win for usability. How about it, Apple?

This post originally appeared on Medium.

Things I have done to fix the ‘Bluetooth: Not Available’ error on Mac OS X

These are all the things that I have tried to fix the ‘Bluetooth: Not Available’ error on my MacBook:

  1. Reset the System Management Controller (SMC)
  2. Reset the PRAM and NVRAM
  3. Repaired disk permissions
  4. Deleted Bluetooth preference files from my Home and System Library folders

And none of them have worked. Looks like my MacBook’s Bluetooth controller is dead. Great.

Update: It’s working again. Apparently all I needed to do was turn the computer off (at the plug), leave it overnight and turn it on again the following morning. How bizarre.

Creative Commons License
Except where otherwise noted, the content on this site is licensed under a Creative Commons Attribution-ShareAlike 4.0 International License.