We bought it because our ten-year-old’s room is consistently colder than the rest of the house. I suspect it’s because the radiator in there is under-powered, and hidden away behind a cover, but it’s typically 2°C colder than our bedroom next door. So far, our mitigations against this have been extra blankets on the bed and a hot water bottle, but I decided that we needed to do more than just keep the bed warm.
Using the ceramic heater
This ceramic heater is designed to be placed on a desk, or similar – it’s not really suitable as a free-standing heater as it’s quite short. It comes with a 1.5 metre cord.
There are a series of touch buttons on the top to control the heater. It has a digital thermostat, so you can set a target temperature and have it heat up to that level. There are four heat modes: low, medium, high and eco, which determine the power output. Low drops it down to 900 watts, and high uses the full 1800 watts of power. Meanwhile, eco mode automatically adjusts the power output to maintain the target temperature. It also includes a built-in timer, allowing it to automatically switch off after up to 12 hours.
It’s very quiet – it’s stated to run at between 28 and 56 decibells. I’m partially deaf, so I’m not the best judge of how noisy something is, but I could barely hear it. It’s certainly much quieter than our air conditioning unit that we use in summer, and quieter than a typical desk fan turned up to full speed.
In terms of its effectiveness, the heater seemed to warm the room up pretty quickly, as measured by its own thermostat. I have a separate ThermoPro thermometer in the room which measured a smaller but meaningful increase in temperature, but the heater isn’t pointing towards it.
Smart features
The ceramic heater uses Tuya as its smart home platform. As regular readers will know, I’m not a fan of Tuya, but I accept that it’s simple to set up, especially if you don’t have lots of other smart devices. Indeed, on opening the Tuya app, Tuya auto-discovered my new heater and asked to configure it. The app controls are easy enough to use, and mirror the controls on the unit.
The key reason why I wanted to buy a smart ceramic heater was to be able to automate it in Home Assistant. Our ten-year-old tends to only use their bedroom for sleeping, so the heater doesn’t need to be on much. Thankfully, when I reloaded the Tuya integration in Home Assistant, it appeared as a climate device. Home Assistant’s controls are limited to setting the target temperature, and turning it on and off; the controls for setting timers and heating power aren’t exposed. But being able to turn it on and off with an automation is possible, and so I have it come on around an hour before bedtime to warm the room up, and then switch off.
A peculiarity with this ceramic heater is that you can link it with Alexa via the Tuya app, but not Google Home. Which is odd; every other Tuya device I have owned supported both. Thankfully, I could add it to Google Home via Home Assistant, so our ten-year-old can use voice control with it.
A bargain
Finally, I want to highlight that this little ceramic heater cost just £20 from Amazon. There are a few cheaper ceramic heaters, some of which simply plug straight into the wall. But they tend to have lower power output, and aren’t smart. As much as I’d rather have something with local control, a smart ceramic heater for £20 is excellent value for money.
Last year, I wrote about a tool called ‘tuya-convert’ which exploits a vulnerability in ESP-based Tuya devices to install custom firmware such as Tasmota. But not all Tuya devices use ESP chips, and that’s where tuya-cloudcutter comes in.
I have one such device, an ‘S11’ RF and IR bridge (pictured above) that I picked up cheaply from AliExpress last year. Instead of one of Espressif’s ESP chips, it comes with a Beken BK7231N chip. Having disassembled its case, I also didn’t find any obvious pins for the UART bus. So I was relieved to come across tuya-cloudcutter, as it doesn’t require any soldering or disassembly. tuya-cloudcutter should work with any devices that use the BK7231T and BK7231N chips.
Like tuya-convert, tuya-cloudcutter exploits a vulnerability. This was responsibly disclosed to Tuya (the bug bounty was donated to charity), and newer devices are shipped without this vulnerability. However, there’s no firmware update for my S11 device to fix the issue, which is perhaps poor from a security perspective but suits my needs right now.
Running tuya-cloudcutter on a Raspberry Pi
You’ll need to run tuya-cloudcutter on a Linux device, and a Raspberry Pi is perfect for this. Indeed, there’s a detailed tutorial to follow. You’ll need Python, Docker, Git and NetworkManager installed and enabled, and there are a couple of configuration files to edit before you start. Everything is done using a command prompt, so you could do it over SSH using a Windows machine with Putty if you wanted to.
A note: I first tried this on my nine-year-old’s Raspberry Pi 400, and it didn’t work, whereas it did on my Raspberry Pi 4. I believe it was an issue with the specific Wi-Fi adaptor in the Raspberry Pi 400.
You may find that it’s easier to have the device already set up in the Tuya or Smart Life app, as you’ll be able to find the existing firmware version. You’ll need this when running the tuya-cloudcutter tool.
Detaching and flashing
tuya-cloudcutter offers two modes:
Detach – this leaves the Tuya firmware intact on the device, but detaches it from the Tuya cloud. You can then use the LocalTuya or TuyaLocal custom Home Assistant integrations from HACS to control your device, but the official Tuya and Smart Life apps won’t work anymore.
Flash – this also flashes new firmware onto the device.
In terms of firmware choices, by default you get:
OpenBeken – a Tasmota-like firmware where you can configure the device
ESPHome Kickstart – a minimal version of ESPHome, which can be updated later.
You can also add your own firmware, although be careful as you may brick your device if the firmware isn’t configured correctly.
If you choose to flash new firmware, then when the tool has run correctly, you’ll see a new Wi-Fi network appear for you to connect to. The Hotspot login page should open automatically, but if not, go to http://192.168.4.1/ to proceed. You can then configure the firmware to connect to your Wi-Fi network.
Switching firmware later
For my device, I tried OpenBeken first, but found that it wasn’t able to use the RF capabilities of the device. Instead, I built an ESPHome configuration, using the tuya_rf custom component, and flashed that, using OpenBeken’s OTA firmware updater. Because once you’ve used tuya-cloudcutter to install new firmware on a device, you don’t need to use it again – you can switch from OpenBeken to ESPHome and vice versa quite easily.
For my Zigbee devices, I use Zigbee2MQTT and a Sonoff USB Zigbee dongle as my co-ordinator. As I came quite late to the Zigbee party, I didn’t pick up a proprietary Zigbee bridge, but if I had, I wouldn’t use one. Today, I’m going to go through a few reasons why.
Examples of proprietary Zigbee bridges include the Philips Hue Bridge, the Ikea Dirigera Hub and the Tuya Zigbee gateway, but there are others. Here are my reasons why it’s best to go with a more open system, like Zigbee2MQTT or Home Assistant’s Zigbee integration. I’ve previously compared the two.
Having all your devices on one Zigbee network
Zigbee is a mesh network. That means that, as more devices are added, the network actually gets stronger, as each device can communicate with each other. This is especially true with mains powered Zigbee devices like smart plugs and light bulbs. Therefore, if all of your Zigbee devices are on the same network, the connection between each device should be stronger. I’ve included a diagram of my network above, and you can see the multiple mesh connections between devices.
If you have multiple Zigbee bridges – say one for your Hue lights and another for your Ikea smart plugs – you risk causing interference between networks. Furthermore, Zigbee runs on the same 2.4 GHz frequency band as Wi-Fi, Bluetooth and your microwave oven. Having everyone on one network should reduce interference.
Better device support
Some Zigbee bridges are better than others, when it comes to supporting third-party devices. For example, you might be able to add an Ikea Tradfri bulb to a Philips Hue bridge, but possibly not another kind of device. Zigbee2MQTT has, arguably, the best device support and will work with just about any Zigbee device, regardless of manufacturer. You can check the Zigbee Device Compatibility Repository to see which devices work with which platform.
My Zigbee devices are a mixture of Tuya and Ikea, and they co-exist well within Zigbee2MQTT.
Cheaper
Most proprietary Zigbee bridges cost around £60. Meanwhile you can plug a USB Zigbee dongle into a spare PC, or a low-powered Raspberry Pi device that you may already have. The USB dongles typically cost £20-30 each (my Sonoff ZBDongle-E costs £27 at Amazon at present [sponsored link]), and you’ll only need one dongle and one computer rather than multiple bridges.
Easier to troubleshoot
With both Home Assistant’s ZHA and Zigbee2MQTT, you can look at the logs to see what’s going on inside your Zigbee network. Hopefully, that’ll help with troubleshooting any devices that aren’t working the way they should. As shown above, you can also get a diagrammatic representation of your network. This lets you see how your devices connect to each other and whether there are any weak spots on your mesh.
Not reliant on cloud services
There’s a risk that your proprietary Zigbee bridges could become expensive paperweights, if their manufacturers decide they’re no longer going to support them and turn off the cloud servers. They may continue to work locally, but if their cloud servers go dark, you may find that you can’t control your devices remotely any-more. By hosting your own Zigbee bridge, you can still have remote access but on your own terms. I use Homeway for remote access to Home Assistant, but you can also set up your own reverse proxy, for example.
Proprietary bridges may offer some convenience and a nice app, But, if you’re willing to put a bit of effort in to manage your Zigbee devices yourself on one single network, I think there are more advantages of going down the route of using Zigbee2MQTT or ZHA.
Last year, I wrote about using a tool called tuya-convert to replace the firmware on my Tuya smart plugs. The firmware in question is Tasmota, which is an open source replacement firmware for devices with Espressif ESP chips. All my Tuya smart plugs have an ESP8266 chip, which can take custom firmware.
There are two ways of flashing Tasmota onto Tuya devices – an easy way, and a harder way.
There’s also a kind-of third ‘super-easy’ way, that I’ll mention towards the end.
tuya-convert – the easy way
I mentioned tuya-convert, which is a command line tool that exploits a vulnerability in older Tuya firmware to install Tasmota. You’ll need a computer such as a Raspberry Pi that has both Wi-Fi and Ethernet, and a smartphone. The tuya-convert tool then creates a hotspot that your Tuya devices can connect to when in pairing mode, and deploys the firmware wirelessly.
The key thing to emphasise here is that it only works with older firmware. Tuya patched the vulnerability in an update that came out some years ago, and indeed I’d already installed this on my smart plugs. That meant that tuya-convert could see the smart plugs, but couldn’t deploy the Tasmota firmware. So, I had to do it the hard way.
Using a UART converter – the hard way
As you may have guessed from the photo above, the only way I was able to flash Tasmota onto these smart plugs was by taking one apart, and using a USB to UART converter with some jumper cables. If tuya-convert doesn’t work, then this is what you’ll need to do. You’ll need the following:
Some Dupont Jumper cables – again, I bought these from AliExpress for £2.40. I picked up a big bag of male-male, female-female and male-female cables, but you only really need male-female cables if you want to save a few pence.
A computer with a USB port
I would also recommend the following:
Some electrical tape to hold things down
A USB extension cable
For the plugs that I was working with, I didn’t need a soldering iron, but some others may require it.
Disassembly and what’s inside
Firstly, it is very, very important that your smart plugs are not plugged into the mains while you do this, unless you want to burn yourself and/or your house down. We’ll be providing power via a different method, so make sure your device is not plugged in via the usual method. With my smart plugs, the positioning of the screws means it’s impossible for them to be plugged into the mains anyway.
Next, remove the screws from the plug. There were five on mine – the central one had to be removed first, and then the remaining four. Once that was done, I carefully separated the top and bottom of the housing.
The bottom part includes the high voltage AC circuitry. We’re not concerned with this and can leave it alone. What we’re interested in is the ancillary circuit board in the top part. It’s held in place by two small screws – you can remove these if you wish, but you can easily access the five pin holes that we need with the board still screwed in place.
The pin holes are as follows, with the first closest to the edge:
RX – data in
TX – data out
GND – ground
GPI00 – the pin hole that puts the smart plug into flashing mode
5V – the 5 volt power input pin hole
Normally, ESP chips work at 3.3 volts, but there’s a converter chip elsewhere on the circuit board for these specific smart plug. Yours may be different, so check first to see if it’s 3.3 volts or 5 volts. The UART to USB converter that I have offers both, so we’ll use five volts for this.
Connecting the wires
Firstly, make sure your USB to UART converter is not plugged in to the computer. You’ll need to get your Dupont cables and connect them from your converter to the board. The pins on the converter should be labelled, so you need to connect them as follows:
From RX on the board to TXD on the converter
From TX on the board to RXD on the converter
From 5V on the board to 5V on the converter
From bothGND and GPI00 on the board to GND on the converter
For this last one, I used three cables – two male-male cable from each of the GND and GPI00 ports on the board, and one female-male cable from the GND port on the converter – and then taped the pins at the end of the wires together. If it helps, there’s a standard wiring diagram on the Tasmota Getting Started page – although we’re connecting one additional wire (GPI00).
Getting read to flash Tasmota
Now that we’ve linked the converter to board, we can do the fun bit – flashing the device. There are several ways you can do this, of which I would recommend two:
Tasmotizer – this is a simple Windows program for flashing. The key advantage is that it can optionally download and backup the previous firmware, just in case you want to restore it later.
Tasmota Web Installer – this allows you to install Tasmota through your web browser, using WebSerial. As it stands, only desktop versions of Chrome, Edge and Opera support it, so you can’t use Firefox or Safari.
Personally, I had a better experience with the Web Installer, so this is what I used. Once you’ve opened your flashing tool, plug the USB to UART converter into your computer and then click ‘Connect’. Your browser will ask for your permission to link the web page with the COM port created by the converter, so you’ll need to grant permission.
Note: sometimes the COM port wouldn’t show for me in the browser. If this happens to you, try opening Device Manager, if using Windows, to ensure that the driver has installed correctly. If not, asking Device Manager to simply update the drivers should be enough. I had the most success if I opened the web page, connected the USB to UART converter and then clicked ‘Connect’ in that order.
If all is well, the web flasher will connect to your device, erase the existing firmware and then upload Tasmota. It’s a quick process – the binary file for Tasmota version 15 is only 655 kilobytes, so it’ll only take a couple of minutes at most.
If you get a connection error, try swapping the RX and TX cables over and then try again, and make sure that the light on the circuit board isn’t on or flashing. If the light is on, it’s a sign that you’ve not connected the GPI00 pin correctly.
Assuming that the flashing worked, you can take the jumper cables out and reassemble your device and plug it back in to the mains.
Configuring Tasmota
So, now that your device has been flashed, you need to configure Tasmota on the device. Get your phone out, and go to Wi-Fi settings. You should see a new Wi-Fi hotspot called ‘tasmota-something-something’, where the somethings are an alphanumeric string – connect to it. A hotspot login box should appear – if not, go to http://192.168.4.1/ in your phone’s web browser.
The first step is to connect Tasmota to your Wi-Fi network. Choose the network, or type it in, and provide the password. Tasmota will then connect, and, if successful, will redirect to its new IP address which it’ll display on screen. I suggest making a note of this.
You’ll now need to navigate to Tasmota’s new IP address in a web browser – you can do this on any device, not just your phone. The first thing we need to do is tell Tasmota what kind of device it has been installed on. The easiest way to do this is with a Template, and there are a huge range of templates listed here. I couldn’t find an exact match for mine, but the closest was this one, which gave me the following template code:
To paste this template into Tasmota, I used this guide. From the Tasmota home screen, I clicked ‘Configuration’, then ‘Configure Other’, and pasted the whole string into the ‘Template’ field at the top. Tick the box that says ‘Activate’, and then the green Save button at the bottom. Tasmota will restart, and then you’ll find that your smart plug now works. Huzzah!
Integrating Tasmota with Home Assistant
If you want your newly Tasmotised smart plug to appear in Home Assistant, then there are a couple more steps that we need to take. Tasmota communicated with other devices using MQTT, so if you don’t already have MQTT set up in Home Assistant, you’ll need to do this. The easiest way is to install the Mosquitto addon; this will then suggest the MQTT integration for you.
Next, we need to create a user account for Tasmota to use with MQTT. In Home Assistant, open Settings, and then People. At the top, select ‘Users’, and then click the blue ‘add user’ button. Give them a username and password, and then save these details somewhere safe for the next step.
Back to Tasmota. Firstly, we need to change a setting to allow Home Assistant to automatically discover your new Tasmota device. From the Tasmota home screen, choose ‘Console’, and input the following command:
SetOption19 0
Press enter. Next, go back to the Tasmota home screen, and into ‘Configuration’ again. Select the ‘Configure MQTT’ option. In the first box, you’ll need to enter the IP address or local hostname for your Home Assistant installation. If you use Home Assistant OS, this is most likely to be ‘homeassistant.local’.
Next, we’ll need to enter the username and password for the MQTT account we created earlier. The rest of the fields can be left with their default values, unless you want to customise the name.
Back to Home Assistant. If this is your first Tasmota device, then you should receive a notification that a new Tasmota device was found, and that you need to install the Tasmota integration. Do this, and your device will now be available. If you add any further devices, these will automatically appear in the Tasmota integration once their MQTT settings have been configured.
And that’s it. You should now be able to control your devices without needing to use Tuya’s cloud services.
The super-easy way – pre-flashed Tasmota devices
If you don’t already own a suitable smart plug, but want to use Tasmota, my advice would be to buy a smart plug with Tasmota already flashed. Local Bytes sell pre-flashed Tasmota smart plugs, so you can skip the disassembly and flashing sections of this guide. Alternatively, try eBay, where these plugs can also be bought pre-flashed.
That being said, I’m pleased to have been able to flash Tasmota on these smart plugs. I’m currently only using one of them, but I’ve been able to give them a new lease of life with about £5 of materials and an hour or so of my time. Indeed, the spare ones may well end up on eBay in due course for someone else to use. It’s far better than letting them become yet more e-waste.
What’s next
Last year I bought a Sonoff Wi-Fi RF Bridge, but was disappointed that it wouldn’t work the way that I expected it to. And getting it to work with Home Assistant was a bit of a pain, requiring a custom integration from HACS or an addon. I’ve already installed Tasmota on it, so it too has local control, and I’m looking at flashing the RF chip with a different custom firmware to make it more useful. That will probably require soldering and is for another future blog post, however.
Phew, it’s been a bit warm, hasn’t it? I was planning to write this review in a few weeks time, but seeing as we’re experiencing a heatwave in England right now, I’ve brought it forward in case you’re considering purchasing an air conditioner yourself.
Earlier this year, we bought a ProBreeze 4-in-1 portable smart air conditioner, and this week, it’s finally been warm enough to put it through its paces for a review. We went with this model as it was a Which Best Buy, and relatively cheap – £250 for refurbished model direct from ProBreeze. Also, I was able to pay for it in three instalments using Klarna, so I’ve actually only just finished paying for it. It’s available from Amazon(sponsored link), but unsurprisingly appears to have sold out.
For an air conditioner to work correctly, you need to be able to pump the hot air out of the room. So, the air conditioner comes with a chonky hose, that you can poke out of a window.
However, to stop the hot air from coming back in again through the open window, there’s a window sealing kit included. This consists of a series of sticky-backed velcro strips, that you attach to your window and frame, and a membrane with velcro edges and a zip with which to make a hole for the exhaust hose to poke through. There’s also a more rigid plastic slidy thing for use with sash windows, if you want to pretend you live in Ecuador.
Part of the reason why I’ve not written this review until now is because the provided hose wasn’t long enough to reach the opening of our window. Our house is at least 100 years old, with nice big windows, and when the previous owners had double glazing installed, they insisted on windows which opened at the top. I ended up buying a longer hose, and some additional velcro strips, from AliExpress to reach the window.
Taking the sealing kit off and on again is a bit of a faff, to be honest. We’ll be leaving it on until the weather’s due to get cooler again on Sunday.
Using the air conditioner
I’m going to cover the disadvantages first:
It’s quite noisy
It’s more expensive to run than a fan
However, it did manage to cool our bedroom down very quickly. We’ve been using it in the evenings, and then switching it off at bedtime. I don’t think we would want it on all night due to the noise.
In terms of the cost of running, expect to spend 20-30 pence per hour to run it. As we’re a day away from the Summer Solstice, we still had sunlight late into the evening last night and so it didn’t actually cost us anything (thank you, solar panels and battery) other than reduced export.
You should also plug it directly into the wall, where possible, and not use extension leads. Because it draws a lot of power, you risk damaging your plugs and/or causing a fire with extension leads. Which would be terrible and also an incredibly ironic way to lose your house, seeing as an air conditioner is supposed to cool it down and not set fire to it.
Hello Tuya, my old frenemy
The ProBreeze air conditioner we bought is also a smart appliance. So although you can control it using buttons on the front, and the included remote control, it can also be controlled using an app or Google Assistant and Alexa.
However, the app in question is Tuya’s Smart Life app. Regular readers will know that I’m not Tuya’s biggest fan (pun not intended) but it seems to work okay, and easily integrates with Home Assistant through the official Tuya integration.
Maybe in future I can take it apart and flash the chip with something else to use it locally, but seeing as I’ve only just finished paying for it, I’ll leave it be for now.
The other three functions
I mentioned that it’s a four in one device. As well as air conditioning, this ProBreeze device can also act as a dehumidifier, and as a simple fan without a cooling mode. I think the fourth mode is a quieter ‘sleep’ mode for use at night. It’s still quite noisy in fan mode, even when it’s not actively trying to cool the air in your room. I believe it’s now branded as a ‘three-in-one’ device.
How it compares to a fan
A simple fan may cool you down, by blowing sweat away from your skin, but it doesn’t actually cool down the air in the room. That’s where air conditioning and air cooling devices come in. Air coolers are usually simpler and cheaper, whereas air conditioning units are more powerful.
Air conditioning at home is still something of a novelty to Brits. We’re not used to hot weather, and our homes are usually designed to retain heat to get us through cold winters. An air conditioning device is therefore unlikely to get much use all year round, but it’s made a difference over these past few days. I’ve glad we’ve bought one – even if it is a bit expensive to run, noisy and a faff to set up the window sealing kit. Anything for a good’s night sleep.
I’ve mentioned that I have a few Tuya smart plug sockets around the home. It’s possible to convert these to run on open source firmware called Tasmota, to gain some additional features, and it’s something I’ve been considering.
The logic boards for many Tuya devices are from the Espressif ESP family, which can easily be flashed with different firmware. Tasmota is one such provider, as is ESPHome which is a sister project to Home Assistant.
What’s wrong with Tuya?
Tuya mostly manufacture ‘white label’ devices that are then sold under a variety of brands. Mine are branded ‘Coosa’ but I’ve seen others called ‘Hey!’ being advertised. Often, they come with their own branded app, but you can use them with Tuya’s own app as well.
I bought them a few years ago because they work well with Google Assistant and IFTTT (which I no longer use). They also work well with Home Assistant (especially since last month). They don’t work with Apple HomeKit natively but can be bridged in using Home Assistant or Homebridge. The other advantage was that you didn’t need a separate hub for them to work – they connect directly to your home Wifi network.
However, Tuya is a Chinese company. Though they claim to have servers in the EU, it could be that every time I use their switches, my request goes via China. In Home Assistant, there are a couple of custom integrations in HACS called LocalTuya and TuyaLocal that can issue commands locally on your home network. But if you use Google Assistant, the commands get sent across the web.
Local control with Tasmota
The Tasmota project offers a tool called Tuya Convert, which replaces Tuya’s official firmware and allows for local control. It mainly uses the MQTT protocol, which is openly documented and used by a variety of different Internet of Things devices. Once flashed onto your devices, they can be controlled locally and don’t need to communicate with external servers. Home Assistant has extensive MQTT support and an official Tasmota integration.
They also work well with Alexa devices, by emulating a Belkin WeMo or Philips Hue device.
This all sounds good to me, but I haven’t gone ahead and done it. Unfortunately, whilst Amazon Alexa is supported, Tasmota doesn’t easily interact with Google Assistant. And once I’ve flashed a device with Tasmota, it may be difficult or impossible to go back to the official Tuya firmware.
I suppose if we used Amazon Echo devices instead of Google Home, this would be a no-brainer.
In the long run, replacing these smart plugs with ones that use Matter would be better and cheaper. My Home Assistant install is pretty-much Matter ready, with no need for an additional hub. Matter, like Zigbee, mostly works locally, and therefore doesn’t have the privacy implications of my current web-based Tuya plugs.
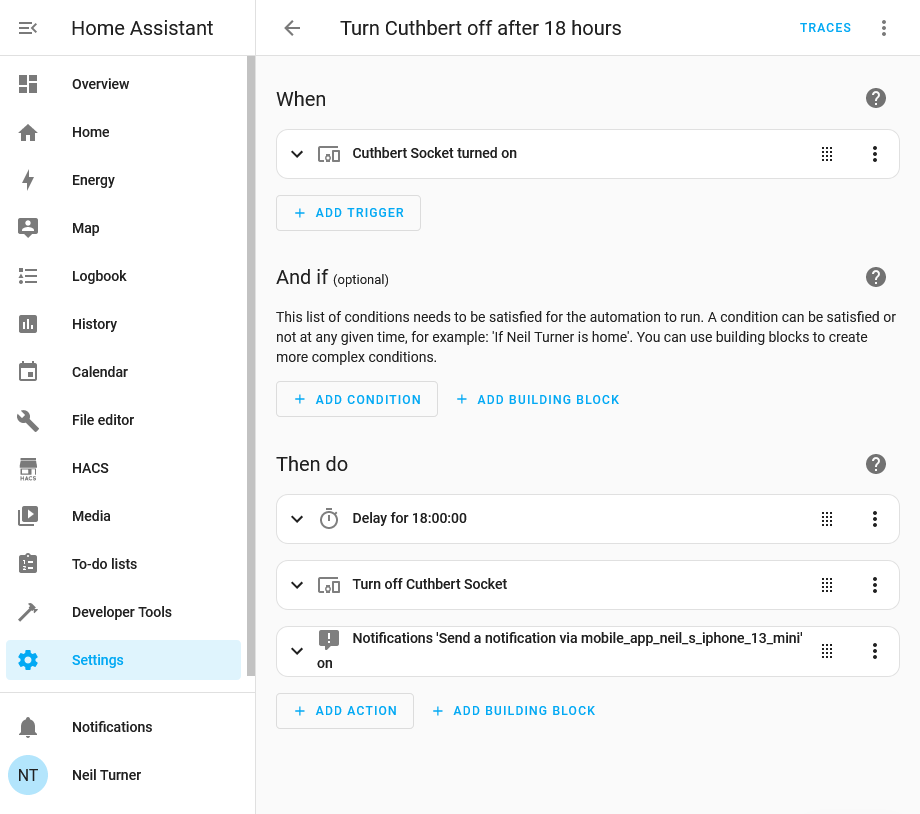
One of the biggest benefits of running Home Assistant in your home is its powerful automation tools for controlling your smart devices. In this example, I have a smart plug socket which I want to run for 18 hours, and then automatically switch off. This is the smart plug that we use for our heated drying rack, and it ensures that the rack doesn’t continue heating for longer than necessary, to save energy. As I run Home Assistant on a Raspberry Pi 4, it only uses 15 watts of power, compared to the few hundred watts that the drying rack requires.
Automations in Home Assistant have become much easier in recent releases. In times gone by, you’d have to write YAML scripts to automate your devices, but now there’s a relatively straightforward interface. Generally, automations work on the principal of ‘if this, then that’ – a bit like IFTTT, but it runs in your own home.
Tuya me, to you
For my automation, I use the trigger of the smart socket being turned on. In my case, this is a Tuya wifi-enabled smart plug, which I’ve called ‘Cuthbert’. We have four Tuya plugs, all with silly names like Cuthbert, just because. Tuya are a white label manufacturer, and so the brand names on the plugs vary despite them being exactly the same. I wouldn’t necessarily recommend them, as presumably every time you turn them on and off, your request goes via Chinese-controlled servers. I would probably buy Matter-enabled plugs instead now but they work fine. Plus, the recent 2024.02 release of Home Assistant massively improves Tuya support and no longer requires you to create a developer account, which is nice.
Automation actions
Anyway, having selected the ‘When’ event, we now need to specify the ‘Then do’ actions to take. First of all, we need a time delay, otherwise as soon as the socket is turned on, Home Assistant will turn it off again. The ordering of actions is important, as I found out the hard way; I originally had the delay after the command which meant that the socket just turned off straight-away. So, we specify a delay and then the action to turn the socket off.
The third action is optional, but it just sends a notification to my phone to tell me that the automation has completed. I’m using the Home Assistant Companion app but you could use an app like Pushover, or trigger an email.
This is a really simple automation, but you can create more complex ones. I’m hoping that, at some point in the future, we’ll have some smart blinds in our kitchen, and I’ll be able to use Home Assistant’s sun integration to open and close them at sunrise and sunset.