Turning an Atom Lite into an Infrared Proxy

A photo of an m5stack Atom Lite which has been flashed with ESPHome firmware to act as a Bluetooth Proxy for Home Assistant

Earlier this month, I wrote about adding Bluetooth Proxy support to an existing Infrared Proxy. Today, I’m doing the opposite: taking an m5stack Atom Lite which already acts as a Bluetooth Proxy, and enabling its Infrared pin in ESPHome.

I’d originally set up the m5stack Atom Lite using the Ready-Made Projects tool on the ESPHome web site, and so all it could do was act as a Bluetooth Proxy. Essentially, all its other features were disabled. Back then, being a Bluetooth Proxy was quite taxing even for an ESP32-based device, and so it was recommended that you didn’t enable its other functions.

Nowadays, the code that powers the Bluetooth Proxy component is more efficient, and so it’s possible to open up some of the other features of the Atom Lite. I’m going to focus on the Infrared Proxy component, as this is relatively new to ESPHome and Home Assistant.

Enabling the Infrared pin

To enable the Infrared pin in ESPHome, we need to add the following YAML code:

remote_transmitter:
  - id: ir_tx
    pin: GPIO12
    carrier_duty_percent: 50
    non_blocking: true

You can also do this in the ESPHome Device Builder using the interface:

  1. Add the Remote Transmitter component.
  2. Enter the pin number as ‘GPIO12‘.
  3. Set ‘Carrier Duty Percent’ to ‘50‘.
  4. Set the ID to ‘ir_tx‘.

Adding the Infrared Proxy

Next, we need to enable the Infrared Proxy component. Again, here’s the YAML code:

infrared:
  - platform: ir_rf_proxy
    name: IR Transmitter
    remote_transmitter_id: ir_tx

And here are the steps to add it in the user interface:

  1. Add the ‘IR/RF Proxy’ component.
  2. Name it ‘IR Transmitter’
  3. Set the Remote Transmitter ID to ‘ir_tx‘, matching the name in step four above.

Save it, recompile your code and upload it to your Atom Lite. If this is already linked with Home Assistant, then you should see it added as an Infrared Remote under Settings, Connectivity, Infrared.

Note that whilst the Atom Lite can send Infrared commands, it doesn’t have the ability to receive them. That means it’s not possible for it to learn commands from other remotes; it can only send pre-defined commands.

Using it in practice to control a Sony Blu-Ray player

Whilst it’s rare that we watch physical media nowadays, we do still have a functioning Blu-Ray player. By parking the Atom Lite in front of it, and using this integration from HACS, it’s now possible to control it using Home Assistant. So far I’ve only tested opening and closing the disc tray but Home Assistant should be capable of controlling most features of the Blu-Ray player.

Enabling other Atom Lite features

The Atom Lite is designed to be a development board, and so features a number of pins that you can connect up to third party sensors or other devices. But it also has a couple of additional onboard features, besides its ESP32 chip and Infrared pin:

  • A button
  • A colour-changing LED

The m5stack documentation includes the necessary YAML code if you want to enable these in ESPHome too. I’ve enabled the colour-changing LED, although as yet I haven’t worked out what to do with it.

How to: multiply two entities in Home Assistant

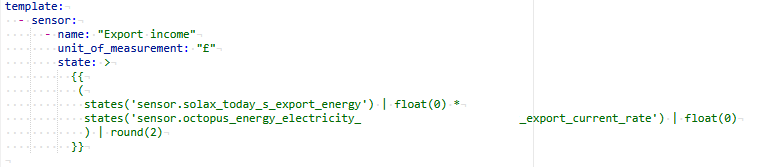
A screenshot of a YAML Template Sensor in Home Assistant that multiplies the values of two other sensors.

Suppose you have two entities in Home Assistant, and you want to multiply them together to produce a third entity that always shows the product of these two entities. Here’s how I went about it.

One of Home Assistant’s built-in integrations is Template. These Template entities derive their status from other entities in Home Assistant, and appear in the Home Assistant web interface as Helpers. You can do some fancy things with these, but all I want to do is multiply the value of one by the other.

Calculating export income

In my case, I wanted an entity that shows how much I’m earning from exporting excess energy generated by my solar panels, once our home battery is full. The amount exported is available as an entity in the SolaX Modbus integration that I use, expressed as a value in kWh. I also use the Octopus Energy integration with Home Assistant, and this has an entity showing my current export rate in £ per kWh. So, multiplying these together will show how much I should be making when I export.

This should be possible to set up as a Helper in the Home Assistant interface, but I personally found it easier to do so in YAML. Also, this is where I was able to ask ChatGPT to help write the YAML code. After tweaking its output to fit my needs, here’s what I’m using:

template:
  - sensor:
      - name: "Export income"
        unit_of_measurement: "£"
        state: >
          {{
           (
            states('sensor.solax_today_s_export_energy') | float(0) *
            states('sensor.octopus_energy_electricity_[mymeter]_export_current_rate') | float(0)
            ) | round(2)
          }}

The name is a human-readable name that I have given to the entity. The unit of measurement is optional – Home Assistant will accept just about anything you type in here, but as the amount will be currency I’ve put in the £ sign.

The ‘state’ bit is where I needed help from ChatPGT, as this isn’t really standard YAML here. We specify the first entity, and add '| float(0)'. The ‘float’ is necessary to provide a floating point number. The * character represents multiplication, and then we repeat the same notation for the second entity. Finally, we specify ‘| round(2)‘ so that the resulting entity rounds to two decimal places. Which, when dealing with an amount of money, makes sense as 0.3333 of one pence isn’t really worth knowing about.

As with any changes to Home Assistant’s YAML configuration, you’ll need to restart Home Assistant after setting this up. You’ll then have a nice new helper, in my case ‘sensor.export_income‘ to plop somewhere on your dashboard. Personally, I have it as a badge which appears once the value is higher than 0. Which, at this time of year, isn’t very often, but we did have a nice enough day a couple of weeks ago to be able to export some electricity.

How to disable go2rtc in Home Assistant

Home Assistant includes support for go2rtc, a streaming video application, which can be used to monitor and store footage from CCTV cameras. Since the November 2024 (2024.11) release of Home Assistant, go2rtc has been included in Home Assistant’s Default Config, which means that integration is loaded automatically on startup. If you don’t have any cameras to monitor in Home Assistant, this can mean some warnings appearing in your logs, and potentially slow Home Assistant down.

There are two ways to disable go2rtc if you don’t need it – a hard way and an easy way.

Hard way: Disable Home Assistant’s Default Config

You can tell Home Assistant not to load the Default Config. This gives you more control over which built-in integrations are loaded when you boot Home Assistant up, however, it means editing your configuration.yaml file. You’ll need to delete the ‘default_config:‘ line, and then create new entries for all the parts of the default configuration that you want to keep. This may be fine for simple installations, but for most users, this will add more complexity. I wouldn’t recommend this personally.

Easy way: Using HACS integrations

There are two HACS integrations that you need to install:

  1. Early Loader
  2. Default Config Exclude

These are not in the standard HACS repository, so you’ll need to open HACS, click on the three dots in the top right, select ‘Custom Repositories’ and then add the Github URLs in turn. You’ll need to install Early Loader first, restart Home Assistant, and then install Default Config Exclude next.

Once installed, you’ll still need to edit your configuration.yaml file, but instead you’ll only have to add a small block. Here’s mine:

default_config_exclude:
  - go2rtc
  - stream
  - cloud
  - my

What you’ll notice is that I’ve added some other integrations – stream, Home Assistant Cloud, and My Home Assistant. If you don’t have any cameras, then not only do you not need go2rtc, you probably don’t also need stream either. I don’t use Home Assistant Cloud or My Home Assistant, so I’ve disabled these too. As well as starting up a little quicker, Home Assistant also now uses slightly less RAM than before.

Creative Commons License
Except where otherwise noted, the content on this site is licensed under a Creative Commons Attribution-ShareAlike 4.0 International License.